What is an RFID Reader/Writer?
Radio-frequency identification (RFID) is a technology that you first consider when implementing a system for identifying or tracking objects, animals, and humans. This is not an entirely new technology, but it has been around for a while now.

In fact, RFID was first used to identify friendly aircraft during World War II. Since then, the technology has been refined, miniaturized, and used in many applications.
In this tutorial, we will focus on the RC522 RFID card reader/writer, and we will learn how to connect and read data from them. We will also learn how to make a system that you can use to switch ON a relay when someone is carrying a card with a known ID.
What is RFID?
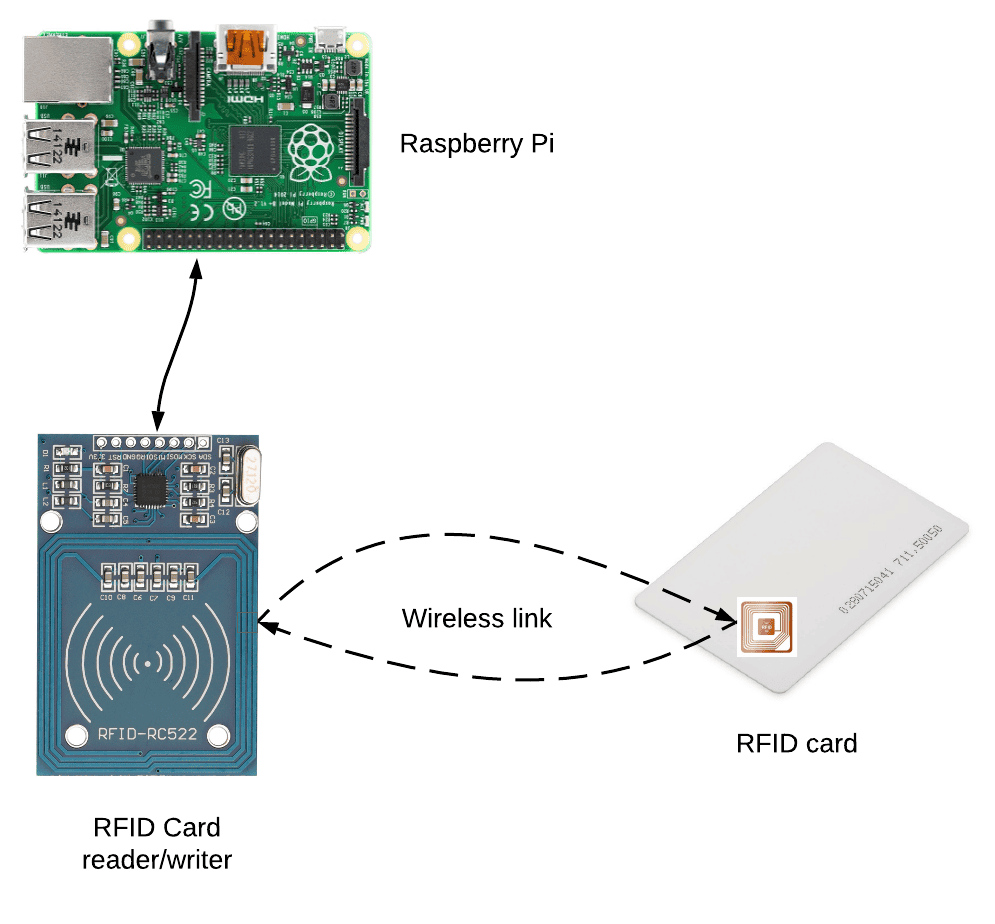
Firstly, RFID stands for Radio-Frequency Identification. This is a system that uses radio waves to identify a person, object, or animal uniquely. Basically, the system comprises three components: a computing platform, an RFID card reader, and the RFID tag. Additional systems can, of course, be added depending on the application scenario.
All RFID cards or tags have two components: (1) an IC which stores a unique identification number and (2) a coil of wire which acts as an antenna.
Some cards are passive, i.e., they do not have a source of power. On the other hand, we have a computer that stores all the RFID card information in a database. We also have an RFID card reader/writer. As you can see from the diagram above, RFID card readers also have a coil of copper wire around them. This coil creates a magnetic field when a current flows through it. So, when you bring an RFID card close to the reader, the magnetic field will induce a current in the coils of the card. This current is sufficient to power the IC and read the information on the card. The information is then transmitted wirelessly to the host computer for verification.
What is an RFID Card Reader/Writer?
In short, an RFID card reader or writer is an electronic device that we use to read information from the RFID card. We can also use the same device to write identification information to RFID cards or tags.

Uses for RFID Card Readers/Writers on the RPi
- Access control
- Inventory management
- Asset tracking
- Animal tracking
- Personnel tracking
- ID Badging
How RFID Card Readers/Writers Work
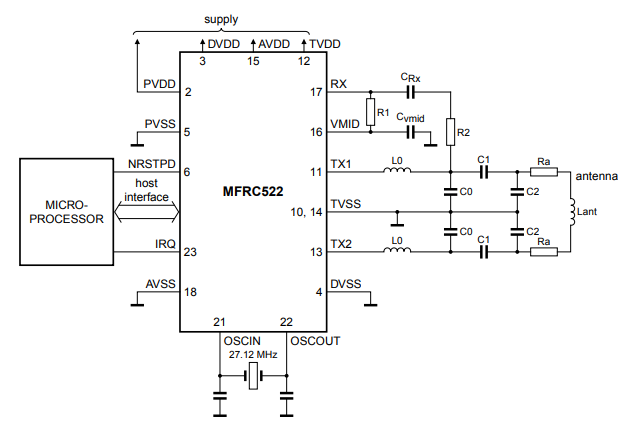
At the heart of this module lies an MFRC522 microchip. This is important because it provides an interface to the RF circuitry. Without this IC, we won’t be able to read the card or tag information. They operate in the high-frequency band, which stretches from 3-30MHz. But most RFID devices usually operate at 13.56MHz.
How RFID Cards and Tags Work
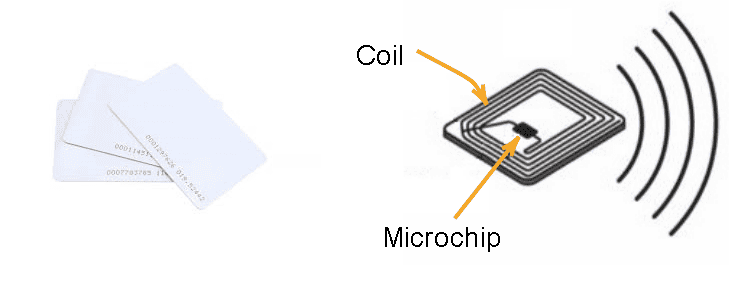
All passive RFID cards have a microchip and a coil of wire which acts as an antenna. An electromagnetic wave created by the RFID module induces a small current in the coils of the card. Thus, the antenna becomes the source of power for the RFID card. This current is sufficient to wake up the microchip. After that, the unique pre-programmed identifier is transmitted wirelessly to the reader.
However, this only works at short distances and when the card and the reader are operating at the same frequency.

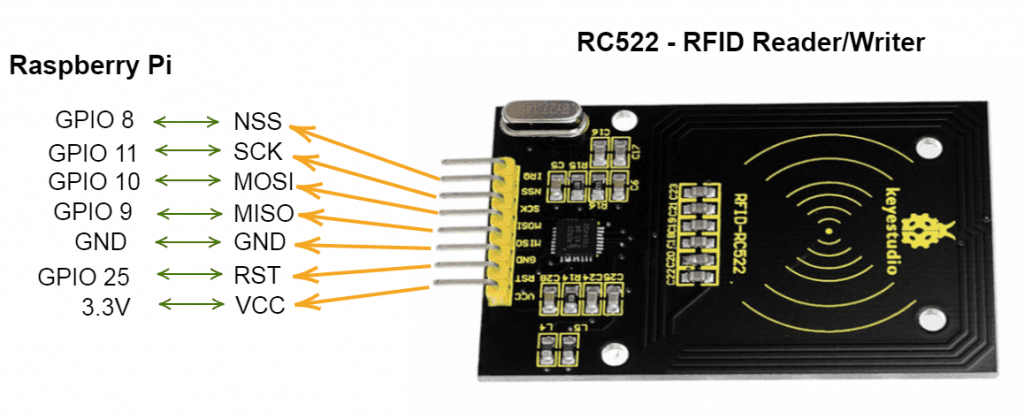
How to Connect the RFID Card Reader/Writer to the RPi
The majority of hobby RFID card readers on the market today typically use SPI for communication. You will find eight pins for power and serial communication. You have pins for master-in, slave-out (MISO), serial data signal (SDA), serial clock (SCK), a master-out, slave-in (MOSI), an interrupt request (IRQ), ground, reset, and 3.3v power rail. You will find an SDA pin on some modules, but here I have an NSS pin instead.
How to Program the RFID Card Reader/Writer with Python
Before we begin, make sure to configure the SPI interface of your RPi. You can find the basics of SPI here. You also need to install pip3. Then, install the MFRC522 Python library.
To install the library, run the following command: sudo pip3 install mfrc522. After a successful install, you are ready to play with RFID through Python.
RFID Card Reader
After installing the MFRC522 library, we are now ready to interact with the cards. Our first step will be to read the information on the cards. To do this, connect the components as shown in the diagram above. Then, create a Python file rfidReader.py and paste the following code.
import RPi.GPIO as GPIO
from mfrc522 import SimpleMFRC522 rfid= SimpleMFRC522() while True: id, text = rfid.read() print(id) print(text)
This library is very straightforward.
First, we import the necessary modules: import RPi.GPIO as GPIO and from mfrc522 import SimpleMFRC522. Then we use the following line rfid= SimpleMFRC522() to create a new object instance which we will call RFID. This has various methods, but for reading the data, we use the read() function: id, text = rfid.read(). Finally, we print the ID and text of the card to the terminal with print(id) and print(text), respectively.
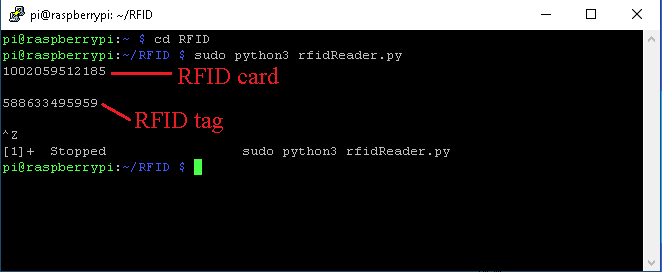
Note that we have put this in an infinite loop, which means that the RPi continuously reads the output from the RFID module.
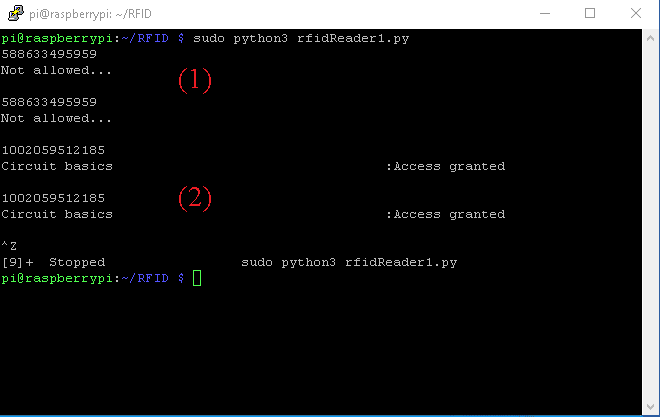
Next, we run the python file with the command sudo python3 rfidReader.py, and we obtain the information as shown in the diagram below. This tells us that our RFID card has the ID 1002059512185 while the tag has the ID 588633495959.
RFID Card Writer
To write information on the RFID card, we use another method of the RFID object: rfid.write(). We can see how this works in the code below. We create a file called rfidWriter.py and paste the code below.
import RPi.GPIO as GPIO
from mfrc522 import SimpleMFRC522 rfid = SimpleMFRC522() try: print("Hold tag near the module...") rfid.write("Circuit basics") print("Written")
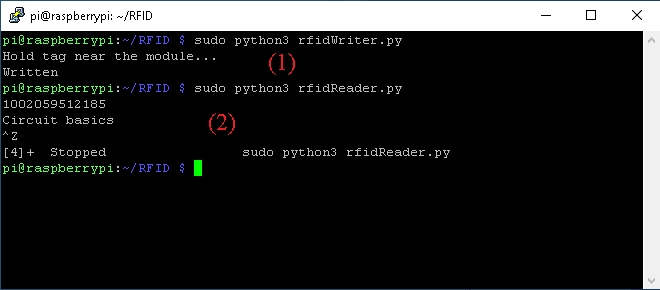
finally: GPIO.cleanup()A notable difference between rfidReader.py and rfidWriter.py is that we do not have a while loop in the latter. This is mainly because we do not want to write the same information on different cards. So we execute the code above as many times as we want to write to different cards. Everything else stays the same, except that we invoke the rfid.write("Circuit basics") when we bring the card closer to the RFID writer. In this case, we write the string Circuit basics to the card.

To see if this operation has been successful, we read the information on the RFID card by re-running the sudo python3 rfidReader.py command. The output should be the same as shown below.
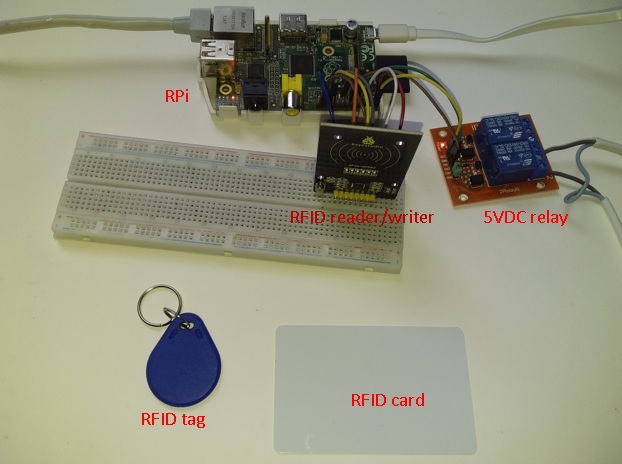
Sample Project: RFID-Relay Control
Finally, we will use the card’s unique ID number to trigger a 5V relay when the card with a registered ID is detected.
Components:
- Raspberry Pi Model B
- RFID RC522 card Reader/Writer
- 5V Relay module
- Breadboard
- Breadboard jumper cables
GPIO Pin Mapping
- GPIO – RPi pin number
- GPIO8 – 24
- GPIO11 – 23
- GPIO10 – 19
- GPIO9 – 21
- GND – 6
- GPIO25 – 22
- 3.3V – 1
- GPIO17 – 11 (relay pin)
Then, use this the following code.
import RPi.GPIO as GPIO
from mfrc522 import SimpleMFRC522
import time GPIO.setwarnings(False)
GPIO.setmode(GPIO.BCM)
GPIO.setup(17, GPIO.OUT) rfid= SimpleMFRC522()
channel = 17 def relay_on(pin): GPIO.output(pin,GPIO.HIGH) def relay_off(pin): GPIO.output(pin,GPIO.LOW) while True: id, text = rfid.read() print(id) if id == 1002059512185: relay_on(channel) print(text+":Access granted") time.sleep(5) relay_off(channel) else: relay_off(channel) print("Not allowed...")
Code Description
Instead of using the LED library to control the GPIO, we declare GPIO pin 17 as an output (GPIO.setup(17, GPIO.OUT)) and we write two functions that turn ON and OFF our output pin: relay_on(pin) and relay_off(pin), respectively. We modify the original rfidReader.py to constantly check the ID of each detected card using the line if id == 1002059512185. If the ID of the detected card matches with the ID in our program, we switch ON the relay; otherwise, we keep it OFF.