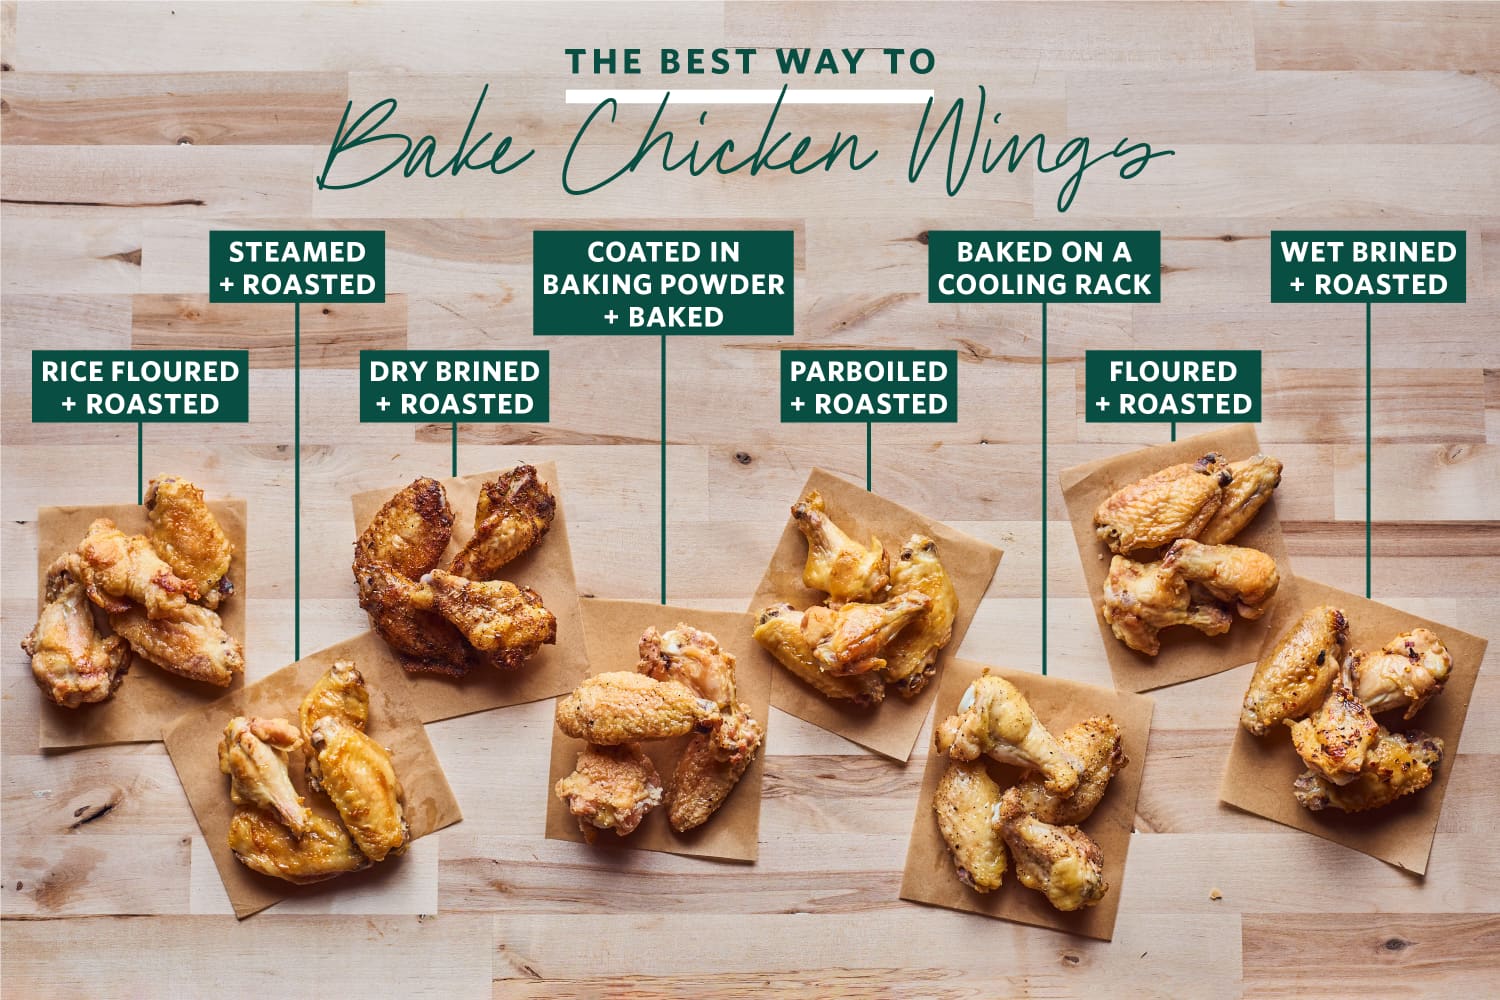
We Tried 8 Methods for Crispy Baked Chicken Wings and Found Your Game-Day MVP
Missing the crispy, salty chicken wings from your favorite bar? We’ve got you covered! Most restaurants and bars deep-fry their wings, which creates a crispy skin and juicy meat — but it’s not possible for everyone to heat up a vat of oil to get similar results at home. For at-home chicken wings, you can just stick them in the oven.
There are a surprising number of different methods for baking crispy wings at home: Some recipes call for cooking the wings first to render some of the fat from the skin, while others call for tossing the raw wings with different pantry ingredients. Baking the wings on a cooling rack is also supposed to be the key to extra-crunchy skin. Set on finding the best method for getting our crispy wings fix, we put eight methods head to head to find the easiest, best method.
How We Tested These Baked Wing Methods
We polled Kitchn staffers on their favorite baked wings and also dug deep into the internet to find beloved and unique techniques for making crispy baked chicken wings. Funnily enough, most “baked” recipes are cooked at a high enough temperature to be considered “roasted,” so you’ll see recipes that call for one or the other here.
In order to taste test all of the wings on the same day, some methods were made the day before. This included brining or air-drying the wings, but other prep methods were done earlier on the test day. We did our best to include both drums and flats in testing, allocating a full pound of wings for each method. A few recipes had similar roasting temperatures, so we batched these tests.
We did not include saucing in this test — most baked wings will soften a bit when sauced, and our ultimate goal was crisp skin. Our ratings take into account time spent prepping (or waiting) and ease, as well as crispy skin and tender meat. Here are our results.
Crispy Wing Method: Wet-Brined and Roasted
About this method: We love brining for juicy roasted turkeys, chickens, and pork chops, so it makes sense that chicken wings would also benefit from soaking in a bath of sugar and salt. We used the brining directions from The Spruce Eats as well as their Buffalo Wing recipe for cooking these wings. The recipe calls for brining the wings in a mixture of spices, vinegar, and water for 2 to 4 hours or up to 24 hours in advance. We went with a short 3-hour brine. After brining, the wings are drained and dried with paper towels before being roasted at 425°F for 45 to 60 minutes directly on a baking sheet. Our wings were golden-brown at 50 minutes on the nose, even though we opened the oven to turn them a few times.
Results: While the finished wings were crispy just out of the oven, they didn’t stay that way for long. The outermost layer of the skin crisped, but the under layer was still flimsy and fatty. We may have been able to fix that with a higher oven temperature or a longer roasting time, but these waterlogged wings didn’t work for us.
Crispy Wing Method: Coated in Baking Powder and Baked
About this method: The Food Lab over at Serious Eats promises that baking powder is the secret to Really Good Oven-Fried Wings. The science behind the idea seems sound: Bump up the crunch by adding surface area with toss a in baking powder, then air-dry the wings overnight. The next day roast the wings at 450°F for about 45 minutes, flipping once about 20 minutes into the roast.
Results: The baking powder truly does something magical to the appearance of the chicken wings after roasting: They look as though they have been properly fried. The skin is crackling crisp upon first bite and yet there’s a tinge of disappointment when the aftertaste of baking powder hits. This metallic flavor would easily be disguised by sauce or perhaps removed altogether with aluminum-free baking powder. But we may never know because we won’t reach for this fussy recipe that leaves a bad taste in our mouth.
Crispy Wing Method: Floured and Roasted
About this method: This old-school method is as simple as it seems: Toss the wings with flour before roasting at a lower temperature to create a baked crust. We followed a Serious Eats recipe that instructed us on quick coating of flour, baking at 400°F for 50 minutes on a well-oiled baking sheet.
Results: While the flour helps create a sturdy coating, it doesn’t necessarily translate to crunchy, crispy skin. Similar to the wet-brined method, just under the skin was a layer of unrendered fat, which means the skin is more slippery than crispy — and nobody wants that. A higher baking temperature might help with this if you really want to coat your wings in flour, but you can easily get better results with one fewer ingredient.
Crispy Wing Method: Parboiled and Roasted
About this method: This two-part method was first brought to our attention via Fifteen Spatulas and is one of two methods that par-cook the wings before roasting. Boiling the wings in salted water for just 7 minutes cooks the meat and also pulls fat out of the skin. Drain the wings, then arrange them on a cooling rack to drain further and cool. You’ll also need to dry the cooked wings with paper towels before roasting. (Dry skin = crispy skin!) Turn the oven up to 450°F and bake the wings directly on a baking sheet for 25 minutes. After the initial roasting time, the wings will be cooked through but not quite crispy, so flip the wings and roast them for 5 to 10 more minutes. This last blast of heat will crisp the skin.
Results: The tenderness of these twice-cooked wings can’t be understated. The brief boil makes them juicy and fall-apart tender. The skin was crispy, but stuck to the pan like crazy! We tore the skin on many of the wings when we flipped them, which could have easily been avoided with a bit of nonstick spray or a sheet of parchment paper. If you want to use a two-step cooking method, skip this one and try steaming and roasting instead.
Crispy Wing Method: Steamed and Roasted
About this method: Like parboiling, steaming chicken wings before cooking give the wings a jump-start on cooking. You can find lots of recipes that use this technique, but we followed the directions laid out by Tasting Table. Steam the wings for 10 minutes, working in batches to keep them in a single level, then set the wings on a rack to cool and drain for at least an hour or up to overnight. After cooling and draining, set the rack inside a baking sheet and roast at 425°F for 25 minutes before flipping and roasting for 25 minutes more.
Results: This technique requires some special equipment (namely, a steamer basket) and quite a bit of planning for something as simple as chicken wings, but it does yield some of the juiciest, crunchiest wings we tried. These are also the least greasy wings — a plus when you want to eat a bucket of wings without stopping.
About this method: Using rice flour was suggested by Kitchn’s Executive Food Director, Nina Elder. Some fried chicken enthusiasts swear by it as the secret for crispy skin. But there wasn’t a recipe that called for rice flour alone. During our rice flour research, however, we ran across the concept of chicken dust, and we may never be the same: You can mix up this mixture of rice flour, tapioca flour, baking power, and spices to have on hand anytime you’d like crispy chicken wings. There are various chicken dust versions out there, but for this test, we followed the technique from the food blog Taste of Healing. Like the flour and baking powder methods, the wings are coated with the chicken dust before roasting for 60 minutes at 425°F.
Results: The mixture of rice, tapioca flour, and baking powder makes a super-crunchy coating on the chicken, and the no-fuss cooking method leaves the meat juicy, not dried out. Plus, the quick prep time makes this widely appealing. The only reason we didn’t rank this recipe higher was that it required more ingredients than the two other techniques that we really loved.
Crispy Wing Method: Baked on a Cooling Rack
About this method: This technique is part of our garlic-Parmesan wing recipe and is the simplest of all of the methods we tried. The wings are dried with paper towels, seasoned with salt, and set on a metal rack set inside a sheet pan. The oven is cranked to 400°F and the wings bake for an entire hour. There’s no flipping, and no fussing — just some golden, crispy wings on a rack.
Results: Beloved by many Kitchn staffers, this technique really does hit a sweet spot of ease and pleasing results. The wings are delightfully crisp because the fat drips away to the sheet pan under the rack. A few wings stuck to the baking rack, and some smaller wings were a bit dry from the long bake time. But all in all, this is a solid recipe — especially given how easy it was.
Crispy Wing Method: Dry Brined and Roasted
About this method: It’s hard to beat dry brining for crispy poultry skin. To dry brine, you simply rub the skin liberally with salt (other spices are optional but recommended). The bird then goes into the fridge to chill out, and while it rests the salt slowly draws moisture out of the skin as it works its way into the meat. For this test, we went with the method in Food52’s Buffalo Wings for a Crowd (the most detailed directions live in the video before the recipe). The wings are tossed with the dry brine, set on a cooling rack for the overnight chill, then baked on a foil-lined baking sheet at 500°F for just 20 minutes. After the first bake, you turn the heat down to 350°F for 10 to 15 minutes more.
Results: Dry brines are so much easier than wet brines, and just as effective. The overnight rest dried the skin of the chicken wings, and then an initial blast of high heat in the oven crisps the skin beautifully. These wings had a thin, crispy skin and the meat was incredibly juicy, thanks to the dry brine and the short cook time. Plus, the foil-lined baking sheet makes these a dream to clean up. After cooking (and eating) eight methods for wings in the oven, these were the only batch with zero leftovers — each wing bone was left picked clean.
Our winning technique proves that making crispy, crave-worthy wings at home doesn’t have to be hard or messy, but it also gives you incredible flavor freedom too. Dry brining allows you to use whatever seasoned salts, dried spices, or peppers you have in your pantry to make a wing totally customized to you. You can make them herby with dried thyme and rosemary or fiery with lots of cayenne and Aleppo pepper. While we also love the winning technique for feeding a crowd, we’re just as happy to learn it now and put it to practice — namely, cooking and eating wings — until we can gather with friends in person again.