Introduction to Web Servers
Wouldn’t it be convenient if you could create and run your own low-traffic website on your Raspberry Pi? Better still, wouldn’t it be easier to use flexible and simple, yet powerful WSGI micro web-frameworks to develop your RPi web server?

In this tutorial, I will show you how to set up a very simple web server on the Raspberry Pi that you can access across the internet. There are many ways of doing this but for this tutorial, we will focus on how to install the Bottle Python web Framework on your RPi. You will also learn how to display the DHT22 sensor readings on the web page such that users can view the readings from a different computer.
Uses for Using the RPi as a Web Server
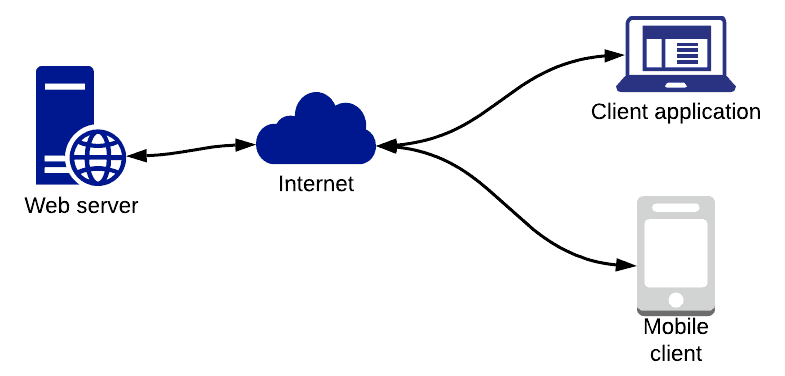
A web server is any computing platform (hardware or software) that keeps data for transmission via the Internet. Setting up a web server on the RPi opens up a lot of opportunities, especially in the emerging field of the Internet of Things arena. Apart from serving sensor data to clients via the internet, different users can interact with the RPi remotely. Here are some of the advantages of setting up the RPi as a web server:
- Lower power consumption
- Small form factor
- No noise
- Large support from the community
- Cost-effective
- Highly portable
The Bottle Framework
The Bottle framework is a simple, yet powerful Python micro-framework that is perfect for small web applications. It has no dependencies other than Python, and it works on most versions of Python. However, it’s only suitable for small web applications and it has a small community that supports the framework.
Features
- Routing: Bottle provides dynamic URL routes for mapping.
- WSGI: The Bottle framework is a Web Server Gateway Interface framework and works with CGI and WSGI.
- Templates: Contains a fast template engine.
- Utilities: The Bottle framework makes it easy to access form data, headers, file uploads, cookies, and other HTTP-related metadata.
- Server: This contains a built-in HTTP development server.
Bottle Development Server vs LAMP Stack
| Bottle | Lamp |
| Small size: The framework is distributed in a single Python file which is 50-60 kB in size. This is considered fairly small. |
The stack requires about 200MB when uncompressed—three separate installs (Apache, MySQL & PHP). |
| Easy to deploy: This framework only requires the Python standard library. |
Developers don’t have control of the available libraries. |
| Easy to operate: Ideal for hosting small web applications. |
Capable of hosting small to high-end web applications. |
| Throughput: Faster than some of the available frameworks for a few clients. |
Handles multiple concurrent requests very well. |
How to Install the Bottle Python Library
Installing the Bottle server on your RPi is quite easy. First, update the available packages on your RPi by typing the following command: sudo apt update. Then, install the Bottle framework into a virtual environment by typing this command: pip install bottle.
Bottle Webserver “Hello World”
1. Local Network
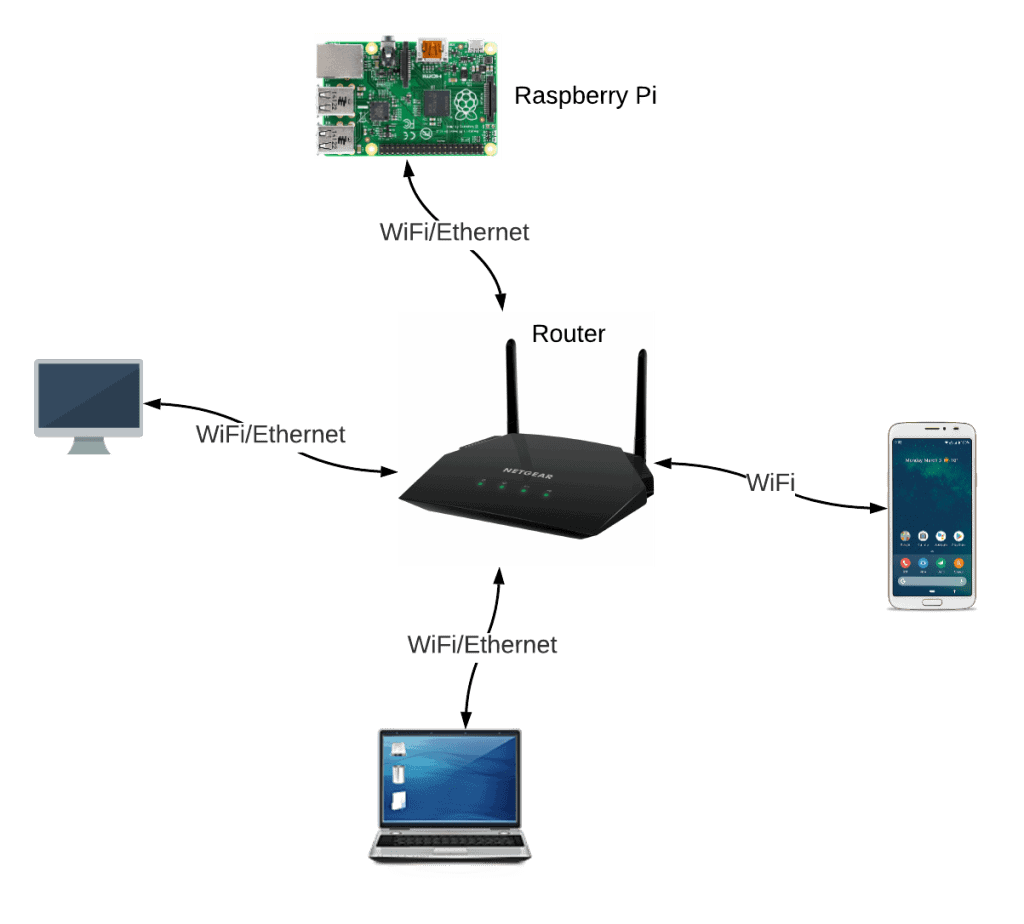
To run a webserver on your Raspberry Pi, you will need to connect the RPi to your network. Here is what you need:
- Network router
- Ethernet cable or WiFi USB modem
- Raspberry Pi
- One or two computers for testing the connection
To build a basic web server, create a Python file and give it any name. I have called mine myServer.py. Then copy the code below into your file and hit Ctrl-X, Y, then press the Enter key to save and exit. Run the command: sudo python myServer.py.
from bottle import route, run @route('/hello')
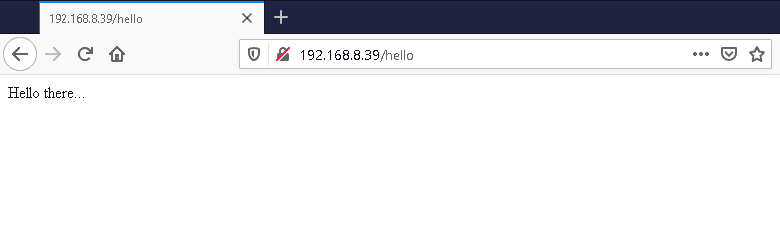
def hello(): return "Hello there..." run(host='192.168.8.39', port=80, debug=True, reloader=True)Next, open your preferred browser, then enter the IP address, port number, and route name as shown below and you will see “Hello there” in the browser. You can also try doing the same procedure on a different computer but make sure that it is on the same network with the RPi.
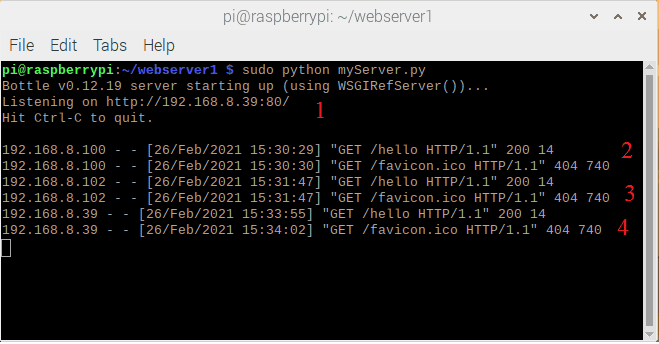
On the RPi terminal, you will see status messages when users access your web page.
Code Description
A web application cannot work without routes. To create a route, follow the following steps:

- First, import route and run from the bottle library:
from bottle import route, run. - Use the decorator
@routefollowed by the actual location of the route. In this case, it’s going to be'/hello', but it can be anything you want to call it. - Then, define a function that will be executed when the route is called:
def hello():. - Next,
return "Hello there..."This function will simply return a text which says “Hello there…” in your web browser. - Finally, tell the Python interpreter to run the built-in development server:
run(host='137.158.131.117', port=8080, debug=True). Specify the host and the port (it can be the local host, or the IP address if you know it).
That’s it for the web page. The next step is to start the server in your terminal. You can do this by running the command: sudo python myServer.py. Then, open your browser and type 192.168.8.39/hello. Note that if the website is running on a different port, you need to include it in the URL as follows: 192.168.8.39:80/hello.
2. Wide Network
At this point, our web page can only be accessed by computers that are on the same network as the RPi. For external users to access our webserver from the internet, we will need to change a few settings on our router. One particular procedure that we can do is called Port Forwarding.
This is a procedure that allows computers on the internet to connect to a specific service within our private network. Basically, we are telling our router to forward any requests that come to port 80 and send the requests to the RPi.


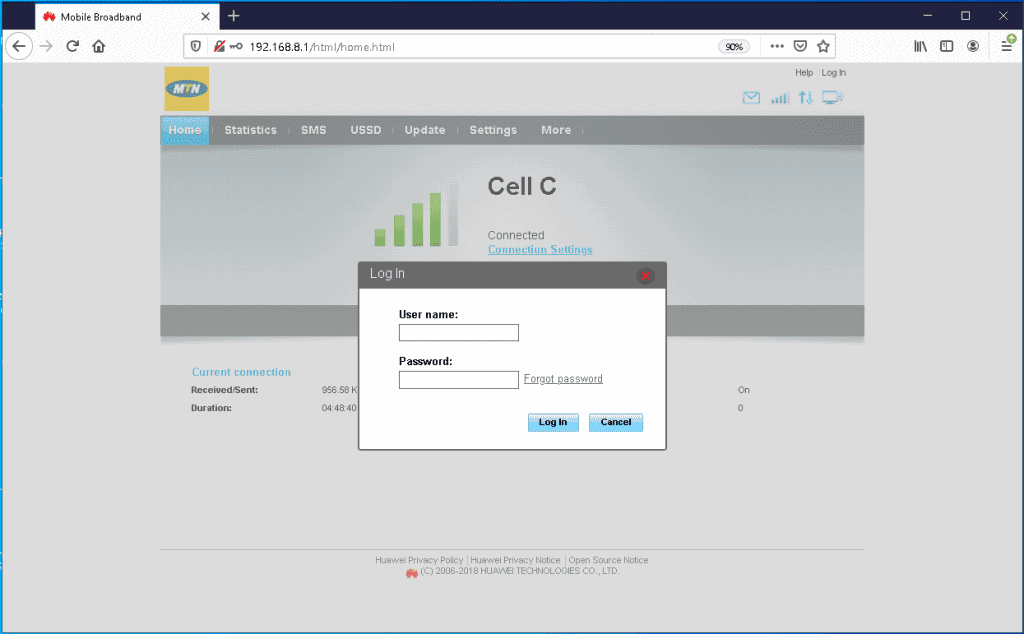
To do this, we need to log into the router’s configuration page by typing the router’s internal IP address in our browser. For my router, I am using the Huawei 4G B315 Router and its internal IP address is 192.168.8.1. This will take you to the configuration page.
Again, I am not going to discuss how to set up an account on your router. There are different brands of routers and they have different configuration page layouts but the end goal is the same. We need to tell the router where to forward any incoming requests. To access the port forwarding page on a similar router, here are the steps you need to follow:

Setting Port Forwarding
On the home page, click “Settings” then enter your username and password.
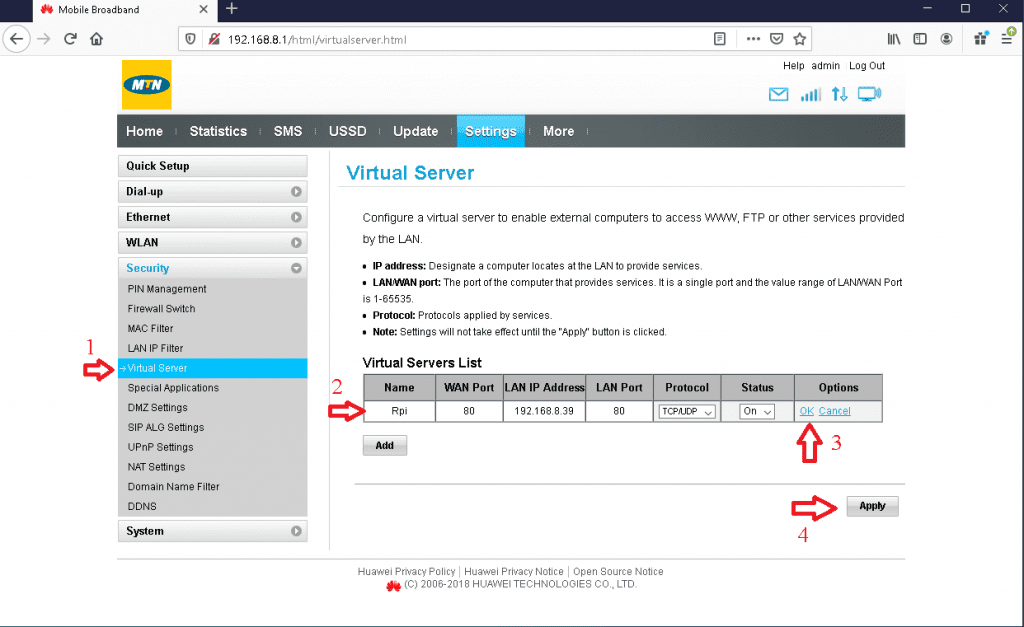
On the settings page:
- Click on “Virtual Server”
- Then click the “Add” button and fill in the entry fields.
- Name – Rpi: Name of the computer
- WAN Port – 80: port for web connections
- LAN IP Address – 192.168.8.39 (Static IP address of the RPi)
- Protocol (TCP/UDP)
- Status ON
3. Click “OK”
4. Finally, click “Apply” and Port Forwarding is now successfully configured for the Raspberry Pi.
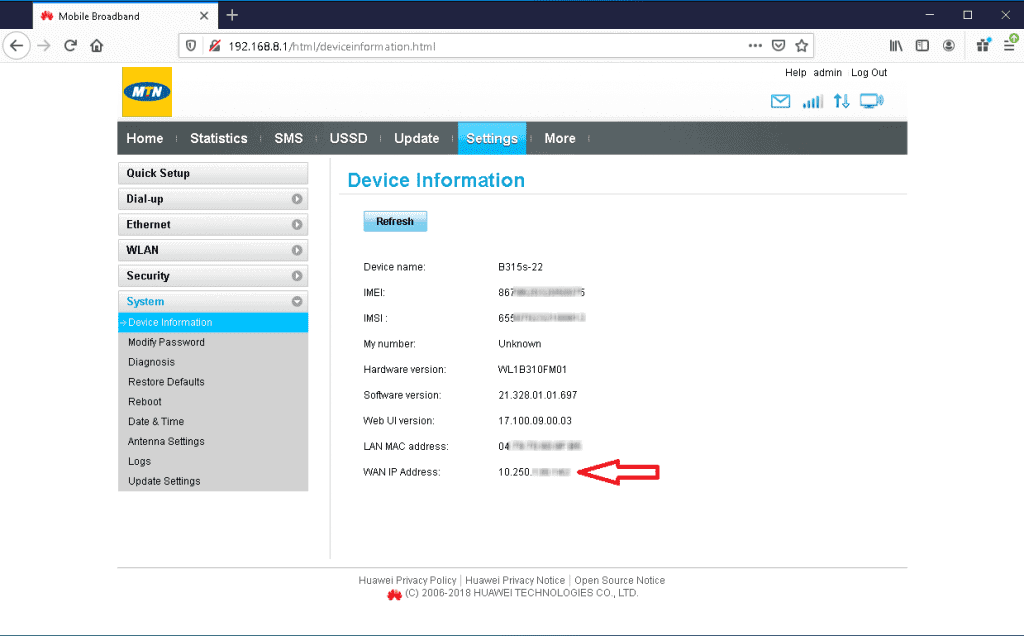
The router’s internal IP address is no longer necessary at this point. Instead, we will use its external IP address. If you do not know the external IP of your router, you can open the “Device Information” page, and check the WAN IP address. Now, when an external computer sends a request to this IP address with port 80, the router will know where to forward that request to.
Example Project
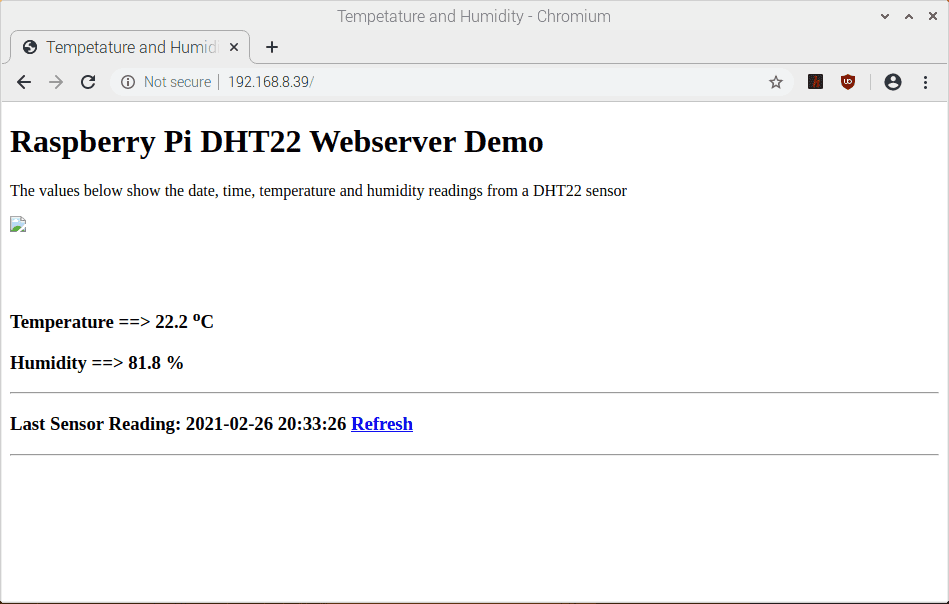
The last task for this exercise is to display the date, time, temperature and humidity readings from a DHT22 on a web page that you can access from the internet.
We have already seen how to access a simple page from the web, so this task will only show you how to display the DHT22 readings on a webpage. I am not going to discuss how to interface the DHT22 sensor with the RPI. If you are not familiar with that step, I highly recommend you to read this tutorial first.
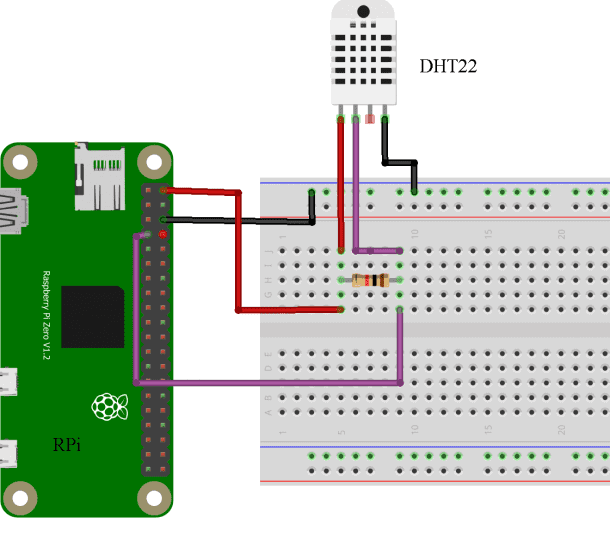
Components
- Raspberry Pi
- DHT22 Humidity and Temperature sensor
- 10K resistor
- Breadboard
- Jumper cables
The .tpl files enable us to write our HTML code. This is convenient if we are going to write many lines of code.
Creating the HTML is simple, and therefore, beyond the scope of this article. In the above code, we just inlined the HTML in the file itself. Here, we modify this to load the template from an external file. Create a new file and name it main.tpl. Copy the following HTML code and paste it into the main.tpl file.
<!DOCTYPE html>
<html lang="en">
<head> <title>Tempetature and Humidity</title> <link rel="stylesheet" type="text/css" href="http://twitter.github.com/bootstrap/assets/css/bootstrap.css">
</head>
<body> <h1>Raspberry Pi DHT22 Webserver Demo</h1> <p>The values below show the date, time, temperature and humidity readings from a DHT22 sensor</p> <p><img src="/home/pi/webserver1/temp_humidity.jpg"></p> <br /><br /> <h3> Temperature ==> {{tempVal}} <sup>o</sup>C</h3> <h3> Humidity ==> {{humidVal}} %</h3> <hr> <h3> Last Sensor Reading: {{myTime}} <a
href="/"class="button">Refresh</a></h3> <hr>
</body>
</html>
Next, create a new Python file where you will define your webserver. I have called mine main.py. Copy the following code into it, save and exit, then run the command sudo python main.py in your terminal.
from bottle import route, run, static_file, template
import time
from datetime import datetime
import Adafruit_DHT DHT_SENSOR = Adafruit_DHT.DHT22
DHT_PIN = 4 HOST = '192.168.8.39' @route('/')
def serve_homepage(): humidity,temperature = Adafruit_DHT.read_retry(DHT_SENSOR, DHT_PIN) humidity = '{0:0.1f}'.format(humidity) temperature = '{0:0.1f}'.format(temperature) time = datetime.today().strftime('%Y-%m-%d %H:%M:%S') myData = { 'tempVal' : temperature, 'humidVal' : humidity, 'myTime' : time } return template('main.tpl', **myData) run(host=HOST, port=80, debug=True, reloader=True)
Open your preferred web browser then enter the IP of the RPi if you are using a computer in the same network as the RPi – 192.168.8.39. If you are using a computer that is on a different network, use the external address of the router – 10.250.xxx.xx.

How the Python Program Works
- The
route()decorator binds a piece of code to the route. In this case, we link the"/"path to theserve_homepage()function. This is called a route (hence the decorator name). Whenever a browser requests a URL, the associated function is called and the return value is sent back to the browser. - The
run()call in the last line starts a built-in development server. It runs on host IP 192.168.8.39 port 80 and serves requests until the server is stopped from the terminal. - The template loads the HTML from a different file. If we have variables that we need to pass to the HTML, we use the following line to call the main.tpl file:
return template('main.tpl', **myData). def serve_homepage():This is a function that will read the temperature, humidity, and time readings and pass the variables to the HTML file.- From this point, it is as easy as adding new
@route-decorated functions to create new pages.
