How to Do a Clamshell Exercise: Trainer Tips
When you think of clams, do you think of the mollusk?
Maybe sitting on a bed of lettuce?
Served on a tray, a foam container, or maybe even in plastic bags by the beach?
Clamshell packaging jokes aside, the clamshell exercise, also known as clams, is a curious exercise that targets your glutes, hip abductors, and pelvis.
The name comes from the position of your legs resembling a clamshell.
Your legs stack on top of each other and hinge open like the top shell or lid of a clam.
It’s an effective exercise that strengthens your hip muscles by moving your lower extremities.
The best thing about this exercise is that it can be completed with little to no equipment.
There are also many variations and progressions that you can work your way up to!
Let’s cover which muscles are worked in the movement, how to perform the basic exercise, and 3 progressively challenging variations.
Also included are some helpful tips, a study that tested 4 progressions of clamshells, and lastly, clams and runners.
What Muscles Does Clamshell Work?
Your glutes are made up of 3 muscles on each side of your body.
From largest to smallest, they are your gluteus maximus, gluteus medius, and gluteus minimus.
While they do work together, each one also serves its own purpose.
The gluteus maximus is probably the most well known.
It’s the largest muscle in your body and aids in hip extension, abduction, and external rotation of the leg.
External rotation is when you turn your toes out.
The gluteus medius is the external rotator of the hip and the main abductor.
Abduction is a movement away from the midline of your body.
The minimus is responsible for the internal rotation (when your toes turn in), abduction, and inward rotation of the thigh (1).
The clamshell exercise targets and strengthens both the gluteus medius and the gluteus maximus.
These gluteus muscles are responsible not only for hip stabilization but for power and balance.
They also protect your lower back and knees (2).
The clamshell can be prescribed for many injuries such as IT Band Syndrome, Patella Femoral Pain Syndrome, and Osteoarthritis.
It can also aid in gait correction, knee or ankle sprains, and low back pain (3).
Note: If you are experiencing any pain or discomfort, consult a clinician prior to starting a new exercise.
How to Perform the Basic Clamshell Exercise
Let’s learn how to perform the basic clamshell exercise!
The instructions below start on the right side. Once completed, switch to the left and perform the same number of reps. It’s important to stay even on both sides!
- Start
Start by laying on your right side and making sure your hips are stacked on top of each other. This can be performed either on an exercise mat or the floor.
- Extend Your Bottom Arm
Stretch your right arm out along the mat. This is to support your head. Make sure to keep your neck neutral to avoid strain.
- Bend Your Knees
Bend your knees to 45-degree angles and stack your top leg, your right, on top of the bottom, your left.
- Engage Your Core
Pull your belly button towards your spine as you engage your core. This is to stabilize your spine and pelvis. Use your left hand for control. You can place it on the ground in front of you or on top of your left side.
- Hips and Feet
Keep your hips, pelvis, and upper body stationary throughout the entire movement. Your feet also remain together as you lift your top knee as high as you can without losing form. On this side, it’s an external rotation of the left femur. Your right leg should stay firmly on the floor.
- Return
Pause at the top. Return your left knee to the starting position on top of your right.
Complete for 20 reps and switch sides, laying on your left side.
Lift your right leg for 20 repetitions.
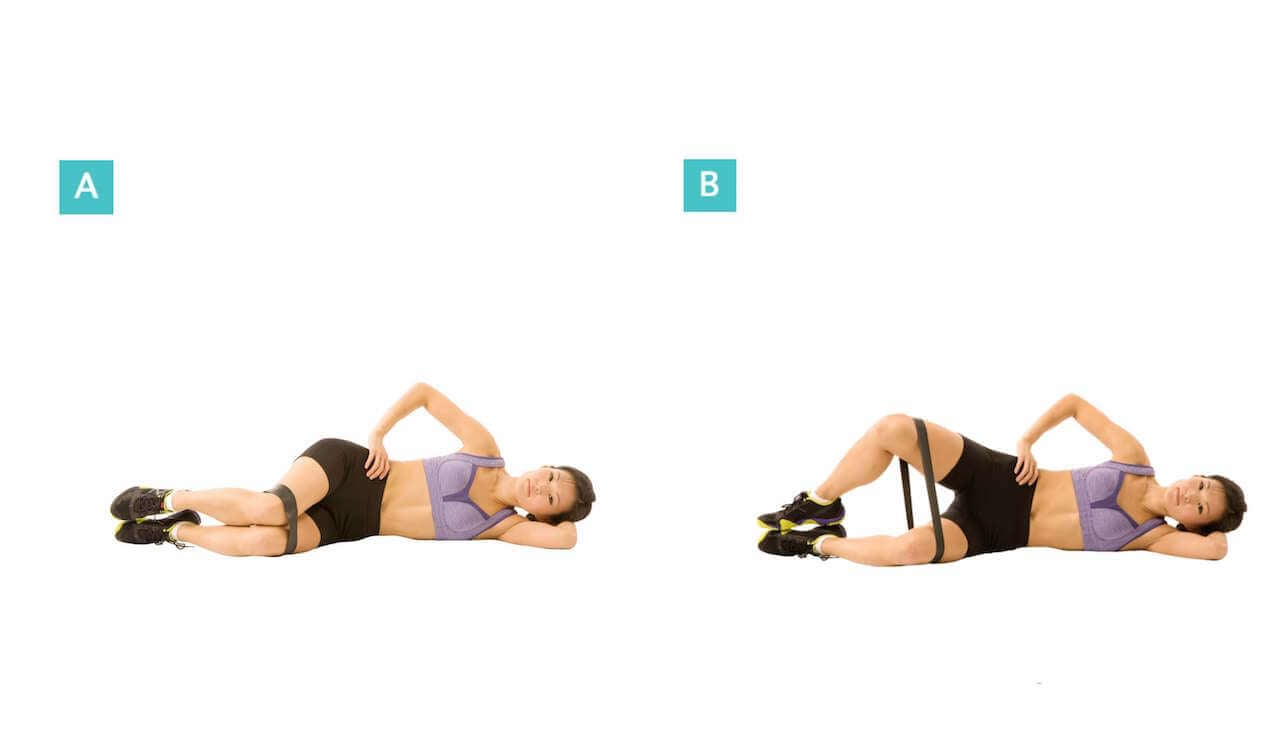
Clamshell Exercise with a Resistance Band
Want to amp it up and really feel the burn in your glutes and hamstrings? Add a resistance band around your thighs.
Choose a lighter band to start, work your way up to heavier resistance.
This is very important! For safety, do not place the band around your knees. You want the band to sit comfortably just above.
- Again, start by laying on your right side, stacking your hips, either on a mat or the floor. Stretch your right arm out to support your head.
- Bend your knees at 45-degree angles and stack them on top of each other. Place a resistance band around the lower part of your thighs, right above the knees.
- Pull your belly button towards your spine as you engage your core to stabilize your spine and pelvis. Use your left hand for control.
- Keep your lower and upper body stationary. Your feet remain together as you lift your left knee as high as you can without losing form. It’s that external rotation of the left femur mentioned before. Your right leg stays firmly on the floor.
- Pause at the top. Return your left leg to the starting position.
Complete for 20 repetitions. Switch sides, laying on your left side with your right leg opening.
Reverse Clamshell
Want to target your smaller internal rotators? Try the reverse clam!
- Begin on your right side, stretching your right arm out in front of you for your head. Use the same alignment markers as the basic exercise. Stack your knees at 45-degree angles. Engage your abdominals.
- Instead of keeping your feet together and lifting your knees, it’s the opposite. Your feet are finding movement in this variation. Rotate your top foot out and toward the ceiling. Your knees stay together throughout the entire exercise.
- Repeat for 20 reps. Switch sides, laying on the left, the right foot finding movement.
If this is uncomfortable or brings discomfort on either knee from the stacking and/or rotating, add a foam roller, durable styrofoam, or a blanket as a cushion.
Side Plank Clamshell
Let’s kick it up to 11 in this even more challenging progression!
- Start by laying on your right side. Bring your forearm parallel to the front of your exercise mat. Your elbow should be directly below your shoulder, fingers spread wide.
- Bend your knees at 45-degree angles and stack them on top of each other.
- Pull your belly button towards your spine as you engage your core to stabilize your spine and pelvis. Use your left hand for control.
- Press through your right forearm and right shin while lifting up your hips. There should be a straight line from the top of your head to your knees. Hold.
- Keep your lower and upper body stationary. Your feet remain together as you lift your left knee as high as you can without losing form. Your right shin stays firmly on the floor.
- Pause at the top. Return the left knee down.
- Repeat for 20 reps. Switch sides and complete on the left side, lifting the right knee.
Clamshell Exercise Tips
- Engage your core! Keeping this muscle group active will protect your spine and provide much-needed stability, especially in the side plank variation.
- Keep your cervical spine neutral. You want to avoid any strain in the neck.
- Only rotate from your hips, not your lower back.
- To fully understand the proper form and how it should feel in your body, you can perform this exercise with your back against a wall.
- Don’t forget to breathe!
- Start with a lighter resistance band and work your way up.
- Practice foam rolling to warm up prior to exercising.
- In addition to working your lower extremities, add a dumbbell in your top hand, mimicking the movement of your top leg for an added arm workout!
Clams and Rehabilitation
The International Journal of Sports Physical Therapy published an article titled Electromyographic Analysis of Gluteus Medius and Gluteus Maximus During Rehabilitation Exercises.
The purpose of the study was to determine which exercises recruit the glute muscles most effectively. (4)
The study took place at Belmont University in Nashville, Tennessee (United States/U.S.) with 26 university students as the participants.
Surface EMG electrodes were placed on the participant’s gluteus muscles, specifically the medius and Maximus to measure the maximal voluntary muscle contraction (MVIC) during 18 various exercises.
4 progressions of the clamshell exercise were tested.
- Basic Clamshell
- Reverse Clamshell
- Basic Clam with your top rotating leg floating over the bottom leg, foot to the ceiling
- Basic Clam with the leg floating and hip extended, foot to the ceiling
5 of the exercises produced greater than 70% MVIC.
Progression 4 of the clam exercise registered at 77% MVIC. (Full instructions below if you’d like to try it yourself!)
So what does this mean?
The higher the percentage of MVIC correlates to muscle hypertrophy.
Hypertrophy is an increase in muscle cell size. The higher the MVIC also means the higher the potential to strengthen those glute muscles.
This is great information for physical therapists and clinicians to know!
Progression 4 of the MVIC study
- Set up in the standard clamshell position by laying on your right side. Keep the same anatomical cues as above. Your right arm is extended, knees stacked at 45-degrees, etc.
- Raise the top leg parallel to the ground. Fully extend through the hip. To check your alignment, use your left hand to reach down and make sure there’s a straight line from your torso to your left thigh. From the view above, the left leg will be floating and positioned behind the right leg.
- Maintain the knee height as you internally rotate at the hip, bringing your foot toward the ceiling. Repeat for 20 reps. Switch sides.
Clams and Runners
Runners often experience knee pain. According to The Physical Therapy Advisor, the common root cause is hip weakness.
One of the best ways to treat the pain is to strengthen the gluteus medius, tensor fascia lata, and other deep hip rotators (5).
If you are experiencing knee pain, please consult an appropriate clinician to address your specific needs.
The Final Take
The clamshell exercise is named so because it mimics the opening and closing of a clam shell. Your legs, of course, resembling said shell.
The exercise focuses on your lower body, specifically hip abduction, and strengthens not only your glute muscles (medius and Maximus) but your pelvic muscles! It can be used in rehab for many common injuries.
This movement is one of those exercise staples that can be performed virtually anywhere with minimal equipment.
Master the basic clamshell exercise before progressing through any of the 4 variations covered here, especially progression 4 with the 77% MVIC.