How to Create User Interfaces
Graphical User Interfaces (GUI) provide a convenient way to interact with sensors. Basically, they provide a form of communication or link between humans and computer peripherals through graphical icons. Humans can see and understand graphical icons, whereas computer systems understand the instructions associated with every icon.

Traditionally, engineers have developed GUIs for high-end and powerful computers. However, that trend has been shifting. We have seen an increase in single-board computing (SBC) platforms on the market lately. They are cheap, portable, consume less power, and are equally capable in terms of computational capabilities. This has led some developers to create GUI development tools for SBCs.
Therefore, in this tutorial, we will develop a GUI for our Raspberry Pi (RPi) and demonstrate how a user can interact with the sensors through the GUI.
What is a user interface?
A user interface is a tool that allows users to interact with a computer application. This can be through visual representations, voice-controlled interfaces, or gesture-controlled interfaces. Apart from interacting with computer applications, users can also communicate with and control sensors, which are part of the computing system. A simple user interface consists of input/output controls, navigation components, and informational components. An advanced user interface may contain displays, tabs, graphing components, and analytics. It all depends on what you want to display or control. A desirable user interface is simple to use, clear, and above all, easy to navigate. In short, users must be able to interact with what they want without confusion.
What is Guizero?
Some libraries can be used to develop GUIs on single-board computers such as the RPi. PySimple GUI and Guizero are two popular tools for GUI development. In this tutorial, we are going to use Guizero for all GUI development.
Guizero is an event-driven graphical user interface framework that uses Python3 to develop simple GUIs on the RPi. The library works with Tkinter, which provides the necessary widgets for GUI development. The most important advantage of using Guizero is the level of abstraction. Like any software library, Guizero ‘hides’ the difficult stuff, and developers can complete complex GUIs without worrying about the low-level implementation.
Guizero Concepts
Guizero uses objects to enable users to develop graphical user interfaces on the RPi. Most of the built-in objects are sufficient for this tutorial. However, for more advanced GUIs, we may need heavy libraries. Here is a list of the objects which we may use to develop our GUI. You can find a detailed description of the Guizero documentation here.
| Object | Description |
| App | The App object creates the main window of our GUI. This will contain all the widgets used within our GUI. app = App(). |
| ButtonGroup | This object creates a group of radio buttons, and the user can select a single option from the group. select = ButtonGroup(app, options=["mon", "tue", "wed","thurs", "fri"], selected="mon"). |
| CheckBox | The CheckBox object displays a checkbox that allows a user to tick or un-tick an option. checkbox = CheckBox(app, text="request leave") |
| Box | |
| Combo | This object displays a drop-down box that allows a user to select a single option from a list of options. combo = Combo(app, options=["mon", "tue", "wed","thurs", "fri"]). |
| Drawing | Users can use this object to create visuals such as shapes, images, and text. drawing.rectangle(10, 10, 60, 60, color="blue") |
| Listbox | The ListBox object displays a list of items from which users can select either a single or multiple items from the list. listbox = ListBox(app, items=["mon", "tue", "wed","thurs", "fri"]). |
| Menubar | This object creates a menu at the top of the screen, with each menu option leading to a submenu.menubar = MenuBar(app, toplevel=["File", "Edit"], options=[ [ ["File option 1", file_function], ["File option 2", file_function] ], [ ["Edit option 1", edit_function], ["Edit option 2", edit_function] ] ]) |
| Picture | The Picture object displays an image. picture = Picture(app, image="test.gif") |
| PushButton | This object displays a button that calls a function when pressed by a user. def display_msg(): print("This is our PushButton"). button = PushButton(app, command=display_msg) |
| Slider | The Slider object displays a bar and selector, which users can use to specify a value in a range. slider = Slider(app). |
| Text | This object displays text in our GUI. The text can be used to refer to titles, labels, and instructions. text = Text(app, text="Hello World"). |
| TextBox | This object allows users to type text in a box. mytextbox = TextBox(app) |
How to install Guizero
Installing Guizero requires Python3, and we use the command pip3 install guizero to begin the installation process. However, if you face any errors during installation, it is always best to address each error one by one. It is worth mentioning that GUI development on the RPi requires an OS image with the desktop. Efforts to develop a GUI interface using the RPi OS Lite version (no desktop) have been fruitless.
Nonetheless, we will continue to research how we can develop GUI interfaces on OS versions that do not have a desktop environment. If you don’t want to go through the hassle of installing different software components on your RPi, we recommend using the most recent RPi OS with desktop and recommended software. In this tutorial, we used the most recent version (at the time of this writing)—the August 2020, kernel version 5.4.
How to use Guizero
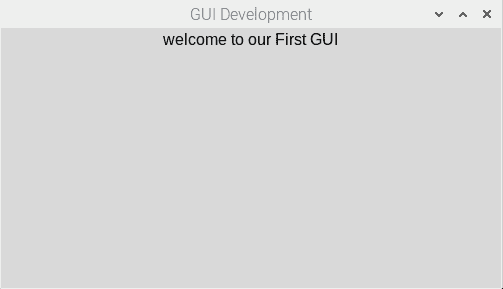
Working with Guizero is pretty simple. As we have mentioned before, this library was developed to simplify GUI development on the RPi. Here is an example of creating a simple GUI which only displays a text message. Save the following code into a suitable Python script and use sudo python3 myFile.py to execute the script.

from guizero import App, Text
app = App(title="GUI Development")
message = Text(app, text="welcome to our First GUI")
app.display()
Code Description
- In Python, we import any software module we would like to use in that script. In this case, we would like to import the Guizero module, so we write:
from guizero import App, Text. Here, we explicitly import the Text and App interfaces from the Guizero library. app = App(title="GUI Development"): We use this line of code to create an instance of App, which has a title of type text – “GUI development.”message = Text(app, text="Welcome to our First GUI"): The message that we want to display.app.display(): To display our app. The terminal will remain engaged until the user quits the app by pressing the close button on the window. Moreover, this line of code enters an infinite loop that waits for events on the GUI. It waits for events such as a user clicking a button, or entering text, and so on.- Finally, we run our app by executing our Python script
sudo python3 myGui.py.
Tips for a Good GUI Design
Here are some tips for a good GUI.
- Styling, layouts, and appearance.
- Maintain high discoverability, i.e., clearly label icons and buttons.
- Keep interfaces simple.
Sample Project 1: LED Control
In this example project, we are going to practice building GUIs with Guizero. We will learn how to incorporate interactivity in the GUI.
Components
- LEDs
- 330-ohm resistors
- 20k resistor
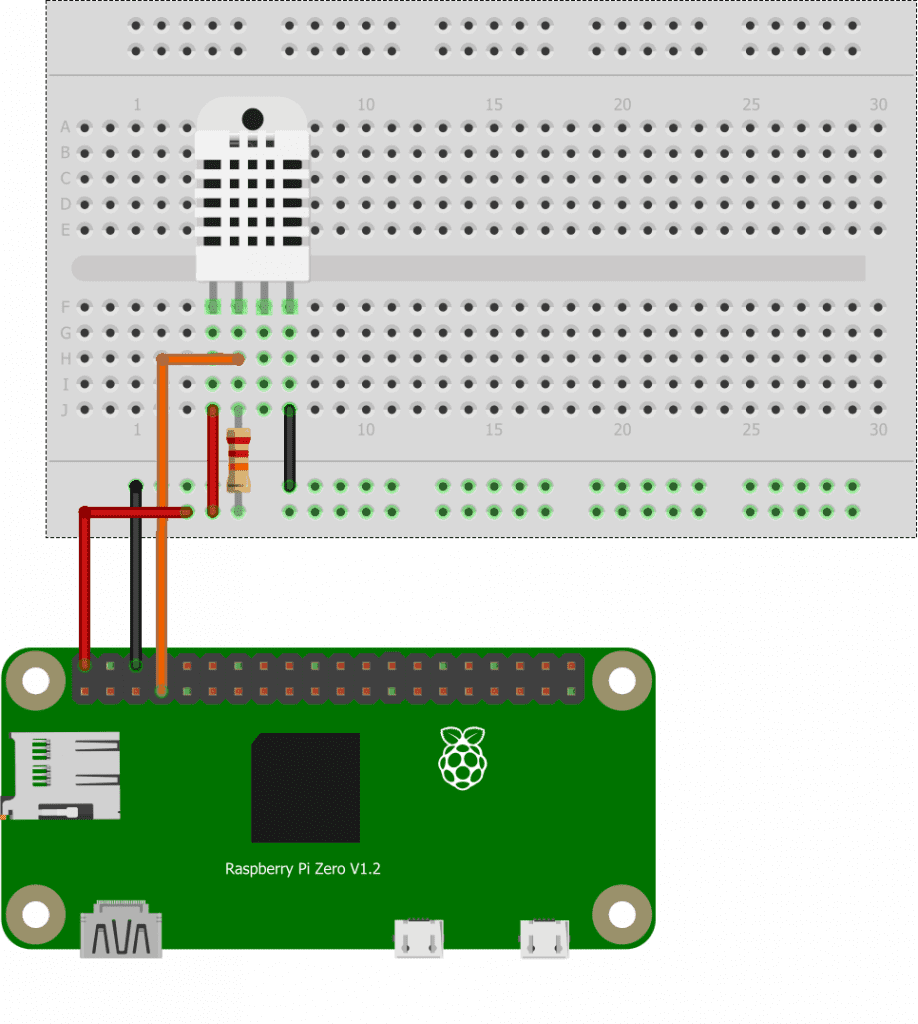
- DHT22 sensor
- Raspberry Pi
- Jumper cables
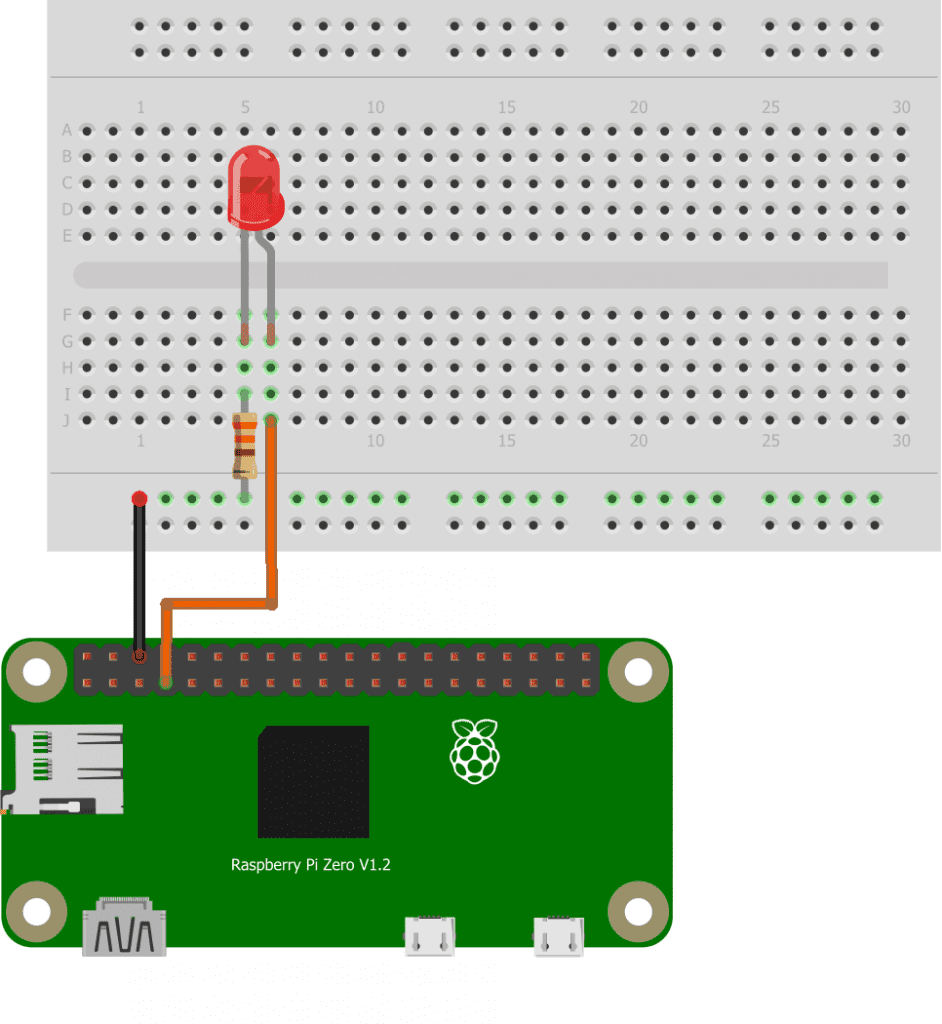
Single LED Control
For our first example, we will demonstrate how to create a GUI with three buttons.
Basically, we want to allow a user to switch ON an LED, switch OFF an LED, and close the GUI. Styling at this stage is not important. We only want to learn the principles of GUI development. However, we can include styling concepts in future Guizero tutorials. Here is the code for controlling a single LED:
from gpiozero import LED
from time import sleep
from guizero import App, Text, PushButton
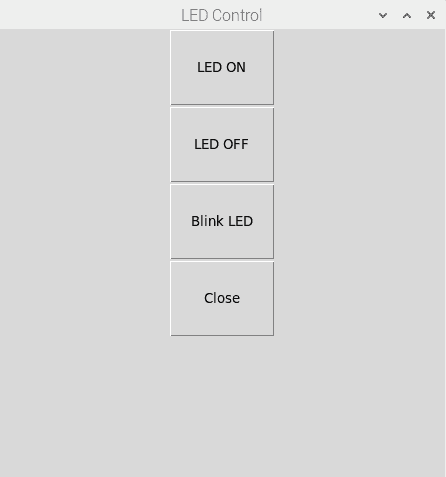
import sys myled = LED(4) def switch_on(): print("ON") myled.on() def switch_off(): print("OFF") myled.off() def close_gui(): sys.exit() myled.off() def blink_LED(): count = 0 while count < 5: myled.on() sleep(1) myled.off() sleep(1) count+=1 app = App(title="LED Control") button1 = PushButton(app, command=switch_on, text="LED ON", width=10,height=3)
button2 = PushButton(app, command=switch_off, text="LED OFF", width=10,height=3)
button3 = PushButton(app, command=blink_LED, text = "Blink LED", width=10,height=3)
button4 = PushButton(app, command=close_gui, text="Close", width=10, height=3) app.display()
Code Description
from gpiozero import LED, from time import sleep, from guizero import App, Text, PushButton: We use these declarations to import the necessary modules. From the Guizero module, we import the App, Text, and PushButton widgets.myled = LED(4): We attach our LED to pin 4 of our RPi.- Next, we are going to define the four functions of our program:
switch_on(), switch_off(), blink() and close_gui(). We use these functions to switch ON the LED, switch OFF the LED, blink the LED with a one-second delay and close the GUI respectively. width=10,height=3and basic parameters are used to set the height and width of the pushbuttons.
Blink LED
The traditional code of blinking an LED ON and OFF in one-second intervals looks like this:
def blink_LED(): while True: myled.on() sleep(1) myled.off() sleep(1)This code works well when we are using this function as a standalone function. However, problems occur when we use an infinite loop inside the GUI. Oftentimes, the app crashes, and we would need to restart the computer, which is not what we want to do when executing our program. If you can see in the full code above, instead of blinking the LED infinitely when a user presses the Blink LED button, I have set a counter, and we are going to blink the LED for a certain period. While we are blinking the LED, our GUI is not accepting any commands during this period. It will only accept new commands when the current loop has finished executing. This is something you would need to consider in your program.
Multiple LED control
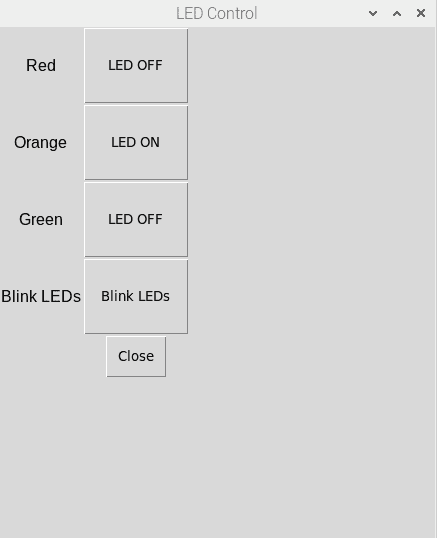
We will use the code for controlling a single LED and modify it to control multiple LEDs. Instead of having two push-buttons for switching ON and OFF a single LED, we will use one push-button and toggle the LED’s status. We are just trying to reduce the code and show you another interesting functionality in the process. We will control three LEDs; therefore, three push buttons to toggle each LED, respectively. Another button will be for blinking all the LEDs simultaneously.
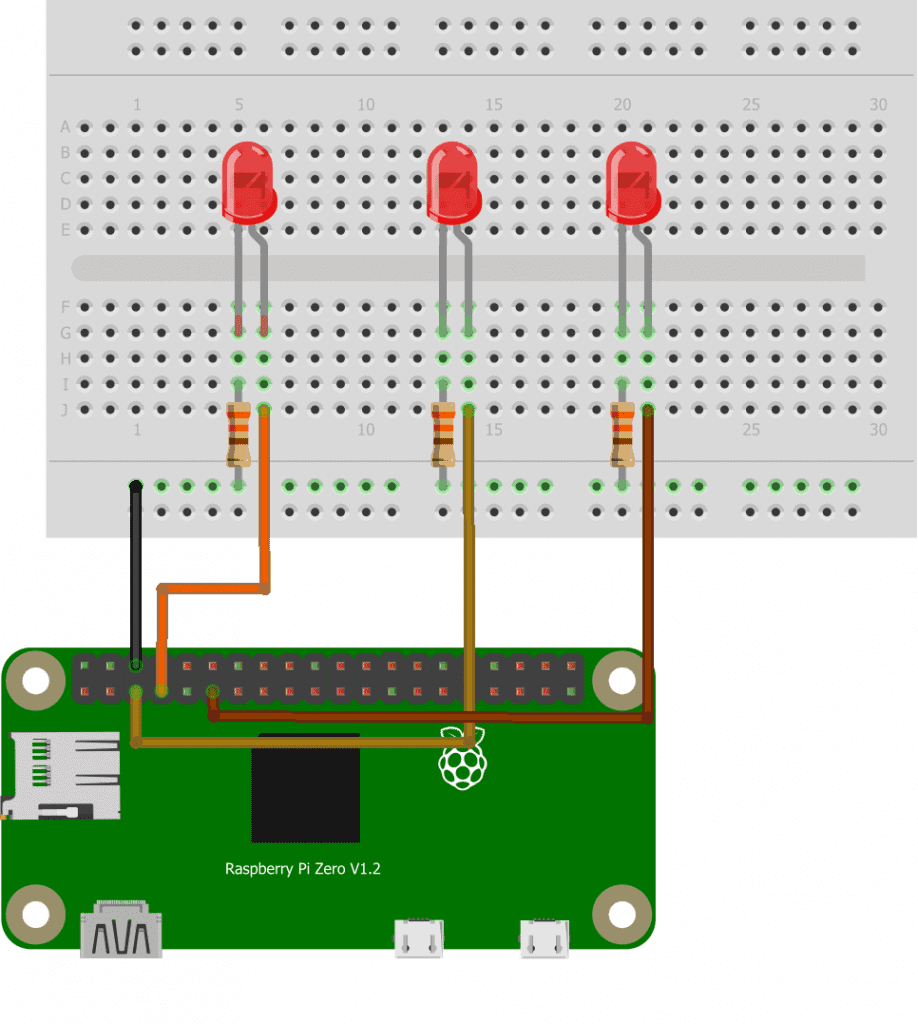
from gpiozero import LED
from time import sleep
from guizero import App, Text, PushButton
import sys led1 = LED(3)
led2 = LED(4)
led3 = LED(17) def toggleLED1(): led1.toggle() if led1.is_lit: button1.text="LED OFF" else : button1.text="LED ON" def toggleLED2(): led2.toggle() if led2.is_lit: button2.text="LED OFF" else: button2.text="LED ON" def toggleLED3(): led3.toggle() if led3.is_lit: button3.text="LED OFF" else: button3.text="LED ON" def close_gui(): sys.exit() def blink_LEDs(): count = 0 while count < 5: led1.on() led2.on() led3.on() sleep(1) led1.off() led2.off() led3.off() sleep(1) count+=1 app = App(title="LED Control", layout="grid", height=600, width=800) Text(app, "Red", grid=[0,0])
button1 = PushButton(app, command=toggleLED1, text="ON", width=10,height=3, grid=[1,0])
Text(app, "Orange", grid=[0,1])
button2 = PushButton(app, command=toggleLED2, text="ON", width=10,height=3, grid=[1,1])
Text(app, "Green", grid=[0,2])
button3 = PushButton(app, command=toggleLED3, text = "ON", width=10,height=3, grid=[1,2])
Text(app, "Blink LEDs", grid=[0,3])
button4 = PushButton(app, command=blink_LEDs, text="Blink LEDs", width=10,height=3, grid=[1,3])
button5 = PushButton(app, command=close_gui, text="Close", grid=[1,4]) app.display()
Code Description
Everything remains the same as the code in the previous section. The only difference is that here, we have only added more LEDs and used the led.toggle() function from gpiozero instead.
Sample Project 2: Display Sensor Readings
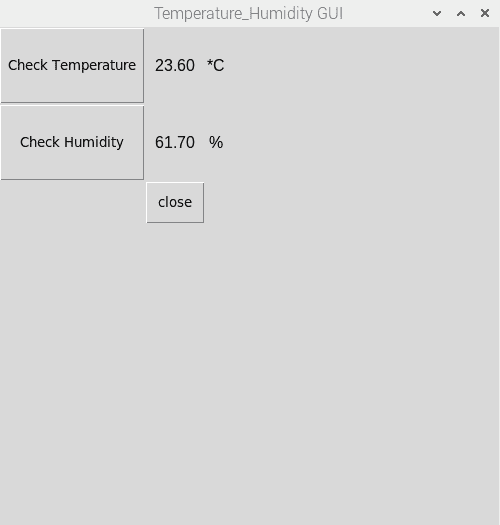
For the second example, we will create a GUI with push-buttons for checking the sensor data. If the data is available, we will use a Text environment that displays the temperature and humidity values from a DHT22 sensor. The aim is to create the GUI temperature and humidity environments, updating when a user presses the respective push-button. Finally, a close button will be used to exit the app.
from guizero import App, Text, PushButton
from time import sleep
import sys
import Adafruit_DHT
DHT_SENSOR = Adafruit_DHT.DHT22 DHT_PIN = 4 def close_gui(): sys.exit() def temp(): humidity, temperature = Adafruit_DHT.read_retry(DHT_SENSOR, DHT_PIN) text.value="{0:0.2f}".format(temperature) def humid(): humidity, temperature = Adafruit_DHT.read_retry(DHT_SENSOR, DHT_PIN) text2.value="{0:0.2f}".format(humidity) humidity, temperature = Adafruit_DHT.read_retry(DHT_SENSOR, DHT_PIN) app = App(title="Temperature_Humidity GUI", layout="grid") PushButton(app, command=temp, text="Check Temperature", width=15,height=3,grid=[0,0])
text = Text(app, text="{0:0.2f}".format(temperature), grid=[1,0])
Text(app, text="*C", grid=[2,0])
PushButton(app, command=humid, text="Check Humidity", width=15, height=3, grid=[0,1])
text2 = Text(app, text="{0:0.2f}".format(humidity), grid=[1,1])
Text(app, text="%", grid=[2,1])
PushButton(app, close_gui, text="close", grid=[1,2]) app.display()
Guizero is an interesting library that allows users to develop GUIs on the RPi. In this tutorial, we have only used the app to control LEDs and display sensor readings but the application areas are endless!