Introduction to DC Motors

A DC motor is an electrical machine that converts a direct current into mechanical energy. Its invention, in the early 19th century, provided a new mechanism to drive machinery.
Fast forward to the 21st century, the DC motor has undergone rapid scientific and industrial advances. Today, they come in different shapes, sizes, and specifications, depending on the application area. What’s fascinating is that DC motors have impacted our lives, and it’s difficult to imagine everyday life without these devices. From tools, toys, elevators to industry, DC motors are, without any doubt, at the center of modern technology.

In this tutorial, we will talk about DC motors. Importantly, you will learn how to connect the DC motor to the Raspberry Pi. Lastly, you will learn how to create a Graphical User Interface to control the speed and direction of a DC motor. Let’s get started.

Uses for DC Motors on the RPi
We find DC motors mostly in industrial plants. But if you look around your house, you will find many devices which have DC motors. Examples include power tools, kids’ toys, and essential hardware. We can easily hook these on the RPi to create some pretty cool projects.
How DC Motors Work
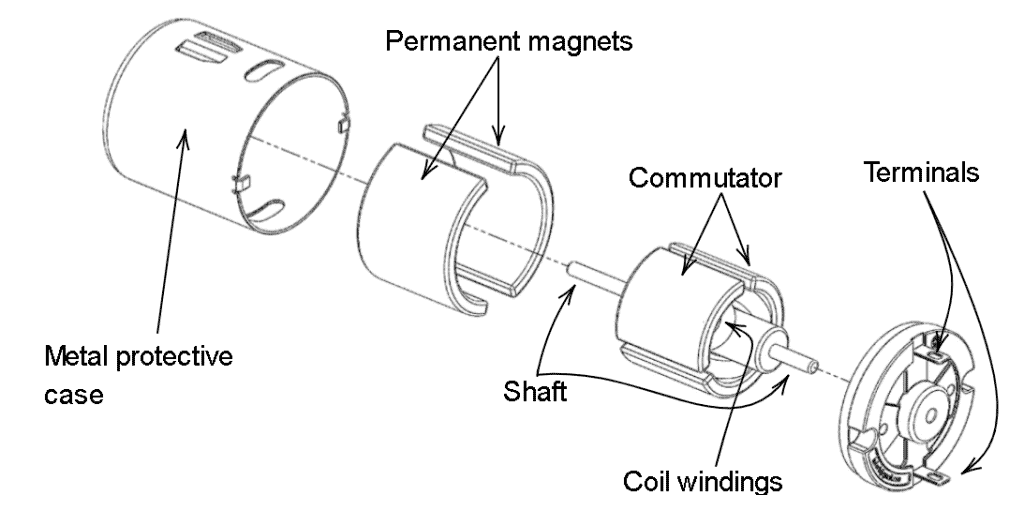
To understand how a DC motor works, we need to level off on how the components fit together. A simple DC motor comprises the following basic parts: permanent magnets, commutator, coil, stator, brushes, and terminals.

The operation of a DC motor is based on the interaction between electricity and magnetism (the principle of electromagnetism). An electric current flowing through a coil of wire creates a magnetic field. When this magnetic field is placed in an external magnetic field, the coil experiences a force that spins the motor. This force is proportional to the current flowing in the coils and the strength of the external magnetic field.
To keep the motor spinning in the same direction, the polarity of the current is reversed, and the direction of the magnetic field also changes. Since like poles repel and unlike poles attract, this reverse in polarization causes the motor to turn the other half revolution, thereby completing a spin cycle. You can improve the rotation of the coils by adding a second coil to the motor. That’s why you see so many coils on the DC motor.

In Summary:
- The commutator receives a DC from the battery.
- When a current passes through a coil in the presence of a magnetic field, the magnetic force produces a spinning force which turns the coils.
- The commutator spins along with the coil, thereby reversing the current with each half revolution. This keeps the coil spinning in the same direction.
Why DC Motors Need a Motor Driver
The Raspberry Pi (RPi) GPIO can only provide a current of 16mA per pin. This is not sufficient to power a DC motor, which often requires a higher supply current. To provide this interface, we use a motor driver. Their purpose is to take a low current signal from the RPi and convert it into a higher current to drive a motor. In this tutorial, we will use the most popular L293D motor driver.
What is an H-Bridge
H-bridges are electronic circuits that reverse the polarity in a circuit without having to swap the terminals physically. Typically, we have 4 switches (S1-S4), Vcc, GND, and the load as shown in the diagram below. In modern electronics, the switches will, of course, be replaced by faster switching transistors. The working principle is simple.
In the first diagram, the motor will not run because all the switches are open. However, if we close S1 and S4, the current will flow from Vcc to the GND through S1 and S4. This will cause the motor to run in a certain direction.
To change the direction, we close S2 and S4. The current will flow from Vcc to the GND through S2 and S3, causing the motor to run differently. These are the only switch combinations that will allow the motor to turn.

L293D H-Bridge
The L293D H-bridge follows a similar design strategy to the one above, except that it uses quadruple high-current half-H drivers. This topology allows the driver to control both the current and speed of the load motor.

How to Connect a DC Motor to the Rpi with an L293D
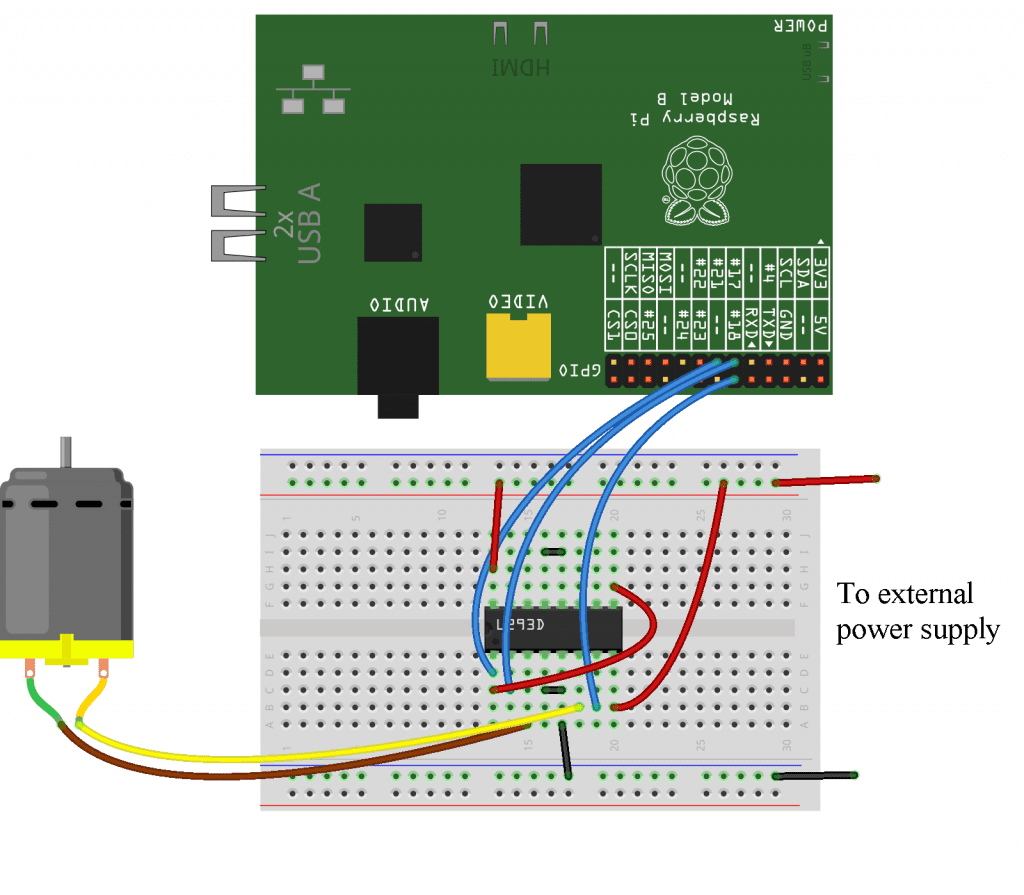
| RPi GPIO | Motor Driver Pin No | Description |
| 27 | 1 (Enable 1-2) | Controls the left part of the driver |
| 17 | 2 (Input-1) | Signal input pin |
| NC | 3 (Output-1) | Connects to one of the motor terminals |
| GND | 4 & 5 | Ground |
| NC | 6 (Output-2) | Connects to one of the motor terminals |
| 18 | 7 (Input-2) | Signal input pin |
| 5V | 8 (Vcc2) | Motor supply voltage: will need to be greater than 4.5v |
| 17 | 9 (Enable3-4) | Controls the right part of the driver |
| 4 | 10 (Input-3) | Signal input pin |
| NC | 11 (Output-3) | Connects to one of the terminals of the motor |
| GND | 12 & 13 | Ground |
| NC | 14 (Output-4) | Connects to one of the terminals of the motor |
| 14 | 15 (Input-4) | Signal input pin |
| 5v | 16 Vss | Power source |
How to Control the Speed and Direction of a DC Motor/L293D with Python
For this example project, we are going to use the motor class of the gpiozero library.
Here is how we do it. But first, we need to set up our user interface on our RPi. The task here is simple: we want to control the speed and direction of two DC motors (with an up, down, left, and right arrow similar to a joystick for a remote-controlled car).
Guizero User Interface
We will need to add a graphical user interface to control the speed and direction of a motor. There are many packages to choose from, but we are going to use the Guizero library for this tutorial.
I believe the code is a bit simple to understand, and we can implement some complex functions with only a few lines of code. However, you have to take into account the fact that GUI blocks threads. It will execute the next line of code until some condition is met.
In the previous tutorial, we have discussed all guizero and how to install them. Here is a recap of how to create a simple GUI.
from time import sleep
from guizero import App, Text, PushButton
import sys app = App(title="GUI Development")
message = Text(app, text="Motor Control GUI") app.display()
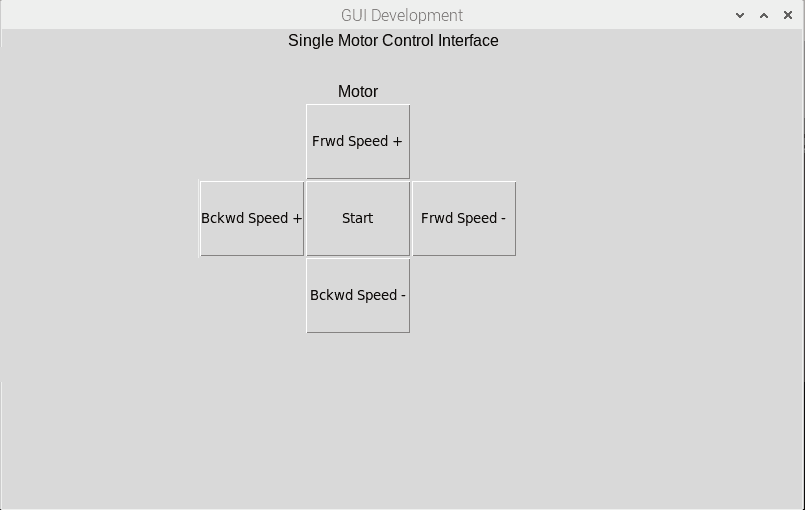
Save the code and execute with the command: sudo python3 myGui.py. If everything has been set up correctly, you should get the following interface on your screen.

Single Motor Control
We will add more lines of code to reach our objective. Remember, we only want to control the speed and the direction of the two motors. But first, we need to test the functionality of one motor. Here is what we need:
- Raspberry Pi model B
- DC motor
- L293D motor driver
- Breadboard
- Jumper cables,
- 9v battery
- Breadboard power supply.

We then add the RPi control signals as shown in the diagram below.

from time import sleep
from guizero import App, Text, PushButton
from gpiozero import Motor, LED motor = Motor(17,18)
motorSwitch = LED(27) app = App(title="GUI Development", layout="grid", height=600, width=800)
message = Text(app, text="Single Motor Control Interface", grid=[4,0]) motorSpeedForward = 0
motorSpeedBackward = 0 def toggleSwitch(): if button0.text=="Start": motorSwitch.on() button0.text="Stop" elif button0.text == "Stop": motorSwitch.off() button0.text = "Start" def forwardSpeedIncrease(): global motorSpeedForward motor.forward(speed=motorSpeedForward) print("Increased speed of motor backward. Current speed = "+ str(motorSpeedForward)) motorSpeedForward += 0.1 if motorSpeedForward >= 1: motorSpeedForward = 1 def forwardSpeedReduce(): global motorSpeedForward motor.forward(speed=motorSpeedForward) print("Reduce speed of motor forward. Current speed = "+ str(motorSpeedForward)) motorSpeedForward -= 0.1 if motorSpeedForward <= 0: motorSpeedForward = 0 def backwardSpeedIncrease(): global motorSpeedBackward motor.forward(speed=motorSpeedBackward) print("Increased speed of motor backward. Current speed = "+ str(motorSpeedBackward)) motorSpeedBackward += 0.1 if motorSpeedBackward >= 1: motorSpeedBackward = 1 def backwardSpeedReduce(): global motorSpeedBackward motor.backward(speed=motorSpeedBackward) print("Reduce speed of motor backward. Current speed = "+ str(motorSpeedBackward)) motorSpeedBackward -= 0.1 if motorSpeedBackward <= 0: motorSpeedBackward = 0 Text(app, "Motor",grid=[2,1])
button0 = PushButton(app, command=toggleSwitch, text="Start", width=10,height=3, grid=[2,4])
button1 = PushButton(app, command=forwardSpeedIncrease, text="Frwd Speed +", width=10,height=3, grid=[2,3])
button2 = PushButton(app, command=backwardSpeedReduce, text="Bckwd Speed -", width=10,height=3, grid=[2,5])
button3 = PushButton(app, command=backwardSpeedIncrease, text = "Bckwd Speed +", width=10,height=3, grid=[1,4])
button4 = PushButton(app, command=forwardSpeedReduce, text="Frwd Speed -", width=10, height=3, grid=[3,4]) app.display()
Code Description
Motor Code
from time import sleep, from guizero import App, Text, PushButton, from gpiozero import Motor, LED: First, we need to import the necessary libraries for the project. For GUI development, we will need the guizero library. And from the gpiozero library, we will import the motor class and the LED class. We need the LED class because it provides a simple way to control the enable pin of the driver. This will enable us to start and stop the motor.
Alternatively, you can write Python code to control the GPIO pins for the motor signals and the enable pin so that you can do away with the gpiozero library. I have only used this library because we only write a few lines of code that are easy to understand and follow.
motor = Motor(17,18) and motorSwitch = LED(27). Here, we create an instance of the motor class. We connect the motor control signals to GPIO17 and GPIO18 of the RPi. The Enable pin control is connected to GPIO27. Next, we initialize two variables: motorSpeedForward = 0, motorSpeedBackward = 0 to control the speed of the motor. We implement that with the following line of code: motor.backward(speed=motorSpeedBackward).
One advantage of using the motor class from gpiozero is that there are functions to control the direction of the motor: motor.forward() and motor.backward(). Good thing these functions can accept the speed of the motor as a parameter. You can find the description here. Then, we create four functions:
- Increase the forward speed
- Reduce the forward speed
- Increase the backward speed and finally
- Reduce the backward speed
GUI Code
Each function performs a mathematical operation depending on what it’s supposed to do. Most importantly, we increment/decrement the variables for the motor speed by a factor of 0.1, and we keep the variables between 0 and 1. The speed cannot go below zero; otherwise, it will be challenging for the RPi to process a negative value of speed.
After defining the functions for the motor, we then create our user interface and call the above functions when a user clicks the corresponding button. Lastly, we call the function: app.display() to run the GUI.


Now that we have seen how to control one motor, it’s time to add another motor. Instead of adding more variables to the code above, let me show you another way of utilizing the gpiozero library.
Dual Motor Control
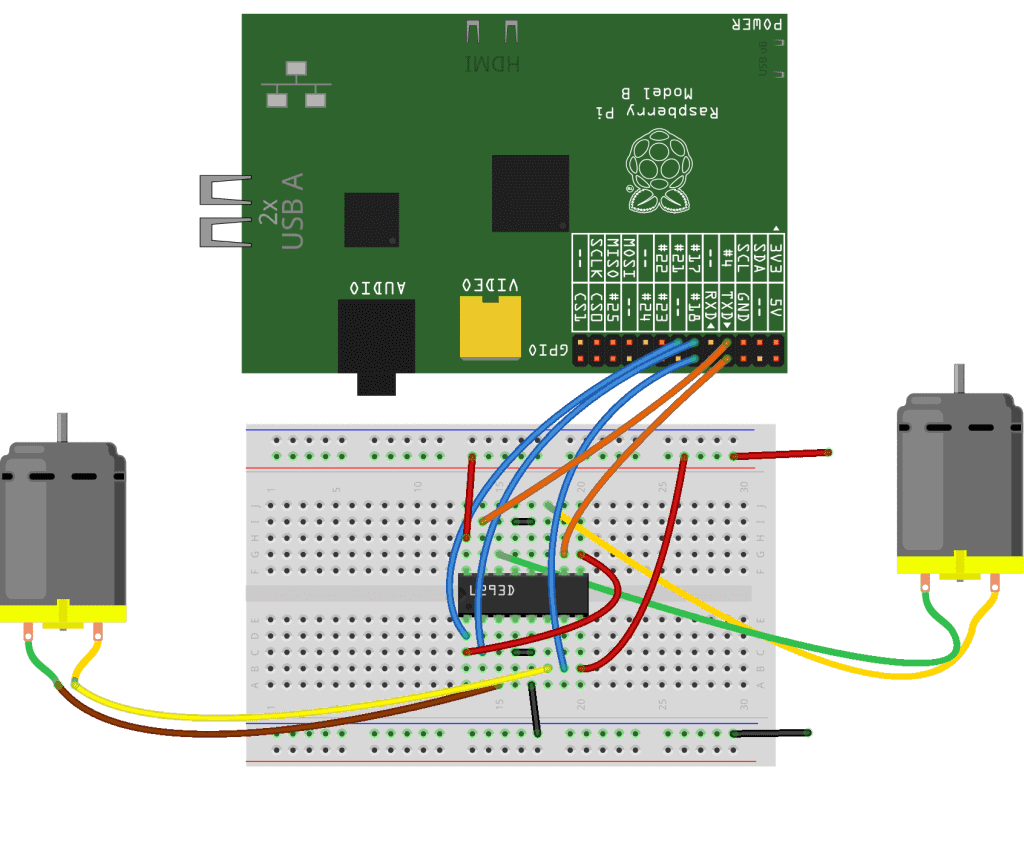
You may want to use a GUI to control the speed and direction of two DC motors. In that case, we make minor modifications to the code above.
From the gpiozero library, we use the robot class as shown in the code below, while everything else remains the same.


from time import sleep
from guizero import App, Text, PushButton
from gpiozero import Robot, LED motor = Robot(left=(4, 14), right=(17, 18))
motorSwitch = LED(27) app = App(title="GUI Development", layout="grid", height=600, width=800)
message = Text(app, text="Dual Motor Control Interface", grid=[4,0]) motorSpeedForward = 0
motorSpeedBackward = 0 def toggleSwitch(): if button0.text=="Start": motorSwitch.on() button0.text="Stop" elif button0.text == "Stop": motorSwitch.off() button0.text = "Start" def forwardSpeedIncrease(): global motorSpeedForward motor.forward(speed=motorSpeedForward) print("Increased speed of motor backward. Current speed = "+ str(motorSpeedForward)) motorSpeedForward += 0.1 if motorSpeedForward >= 1: motorSpeedForward = 1 def forwardSpeedReduce(): global motorSpeedForward motor.forward(speed=motorSpeedForward) print("Reduce speed of motor forward. Current speed = "+ str(motorSpeedForward)) motorSpeedForward -= 0.1 if motorSpeedForward <= 0: motorSpeedForward = 0 def backwardSpeedIncrease(): global motorSpeedBackward motor.forward(speed=motorSpeedBackward) print("Increased speed of motor backward. Current speed = "+ str(motorSpeedBackward)) motorSpeedBackward += 0.1 if motorSpeedBackward >= 1: motorSpeedBackward = 1 def backwardSpeedReduce(): global motorSpeedBackward motor.backward(speed=motorSpeedBackward) print("Reduce speed of motor backward. Current speed = "+ str(motorSpeedBackward)) motorSpeedBackward -= 0.1 if motorSpeedBackward <= 0: motorSpeedBackward = 0 Text(app, "Motor",grid=[2,1])
button0 = PushButton(app, command=toggleSwitch, text="Start", width=10,height=3, grid=[2,4])
button1 = PushButton(app, command=forwardSpeedIncrease, text="Frwd Speed +", width=10,height=3, grid=[2,3])
button2 = PushButton(app, command=backwardSpeedReduce, text="Bckwd Speed -", width=10,height=3, grid=[2,5])
button3 = PushButton(app, command=backwardSpeedIncrease, text = "Bckwd Speed +", width=10,height=3, grid=[1,4])
button4 = PushButton(app, command=forwardSpeedReduce, text="Frwd Speed -", width=10, height=3, grid=[3,4]) app.display()
That’s all we need to change to control the two motors!


